

Disable Windows Defender
Windows Defender is a Pre-installed anti-malware software that helps protect your computer from virus, malware, spyware, adware, phishing, ransomware and many other threats to your computer. It is an application that Microsoft provides in every version of Window. Despite it an antivirus it gets automatically disabled when it detects that there is any other antivirus app working in the computer. But in Windows 10, it is not the case. Windows Defender runs in parallel with other Antivirus programs.
In Windows 10 it has got better features and great user interface but with good features there comes some cons and one of which is Windows Defender cannot be disabled permanently or uninstalled from the computer unless you follow the special methods. Here you can find those special methods and Turn off Windows Defender in Windows 10 or any other version of Windows.
[toc]

What is Window Defender Antivirus?
Window Defender is an anti-malware software built by Microsoft to help protect the computer from virus, malware, adware, ransomware, spyware, phishing and any other unwanted programs. In the earlier versions of Windows, Windows defender only protects the computer from spyware but soon after the Windows 8, it starts to do multiple tasks to ensure the security of your Computer or Laptop. It is a real-time protection tool and works for both offline and online modes. The only negative point of Windows 10 update is that there is no option available to directly disable Windows defender or its services. However, there are alternate ways to turn off window defender in Windows 10.
Though Windows Defender is a good antivirus but in some cases, one might need to disable or turn off the Windows Defender. Sometimes it happens that you are doing any work on internet and website is blocked by Windows defender or while you are copying some files it gets corrupt or deleted by Windows Defender so you may think to disable the antivirus. Before doing any changes with Windows, make sure that you know what you are doing.
How is Windows Defender Affecting Windows Performance?
Anti-virus uses a lot of RAM whether it is Windows Defender or any other third party antivirus software. So here are few cons of Window Defender:
- Full scan slows down the PC
- Slows down significantly during updates
- Slows down copying speed due to the slow scanning speed
- Slow and buggy malware removal
- Tweaked settings are still bypassed by malware
- Long update time
- Use more RAM during the scan or other background tasks
- Sometimes identifies real non-malware programs as risky ones and change or deletes them
So these were few of the reasons due to which users opt to disable or turn off Windows Defender Temporarily or Permanently.
CHECKOUT – What are the Best Free Antivirus Programs for Windows in 2018?
Can I Disable Window Defender Antivirus?
Yes, it is possible to disable Windows Defender Antivirus in your Windows Computer. It is an important part of the system and should not be disabled or not a right thing to mess with but if you still want to disable to test out few things or do any work then you can go ahead. Before proceeding, we would recommend you to make sure you have any other good Antivirus Program installed and active.
You might have already tried finding an option to disable Windows Defender in your Windows 10. There’s no dedicated settings where you can disable or turn off Windows Defender Temporarily or Permanently, especially in Windows 10. In this case, you have to follow special methods which are listed and guided here.
How to Disable Window Defender in Windows 10?
[wp_ad_camp_5]
We are here with solutions you can try to disable or turn off window defender. All the method described below are tested and working. So choose and follow the methods which are appropriate as per your needs or requirements. Here is quick overview on the list of special methods to turn off Windows Defender Tool in Windows 10.
- Method 1 – Turn off Windows Defender Temporarily
- Method 2 – Disable Windows Defender Using Local Group Policy Editor
- Method 3 – Disable Windows Defender Using Registry Editor
Using these solutions, you can disable or turn off Windows Defender Program temporarily or permanently as per your choice and requirement. Just start following the steps.
Method 1: Turning Off Windows Defender Temporarily
You can start with following this method to turn off Windows Defender Security Features. This may be a temporary solution which may revoke the changed settings on next boot. If you are looking to permanently disable then follow the other 2 methods.
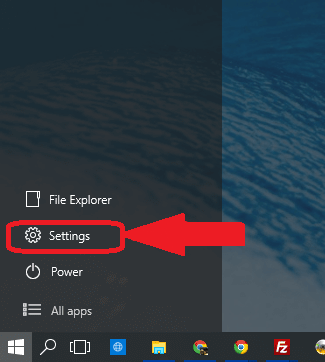
Step – 1: First of all click on Setting in Start Menu.
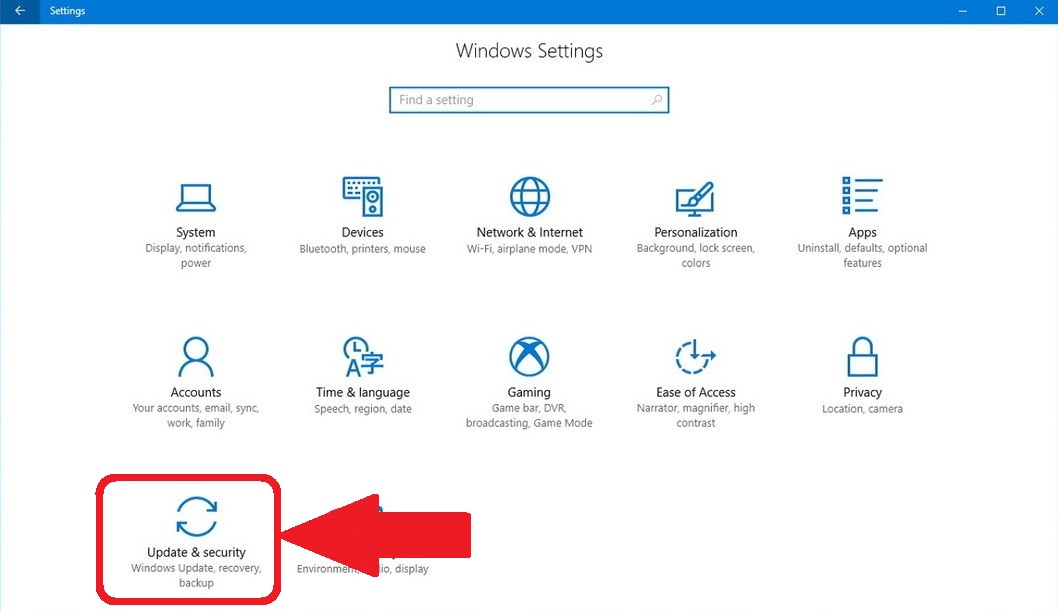
Step – 2: Now in Setting click on Update & Security.
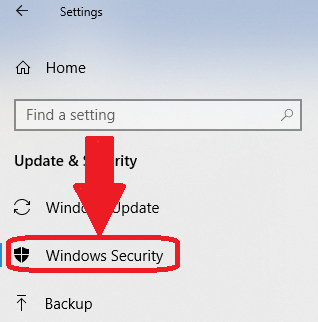
Step – 3: From the left panel, click on Windows Security.
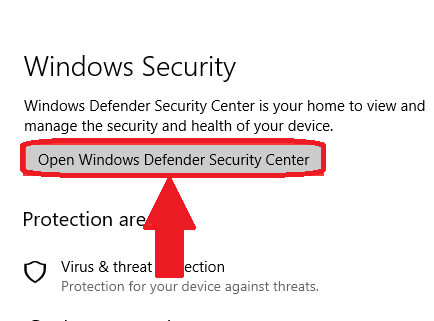
Step 4: Now in Window Security, click on Open Windows Defender Security Center.
Step – 5: In the Windows Defender Security Center, click on Virus & Threat Protection settings option.
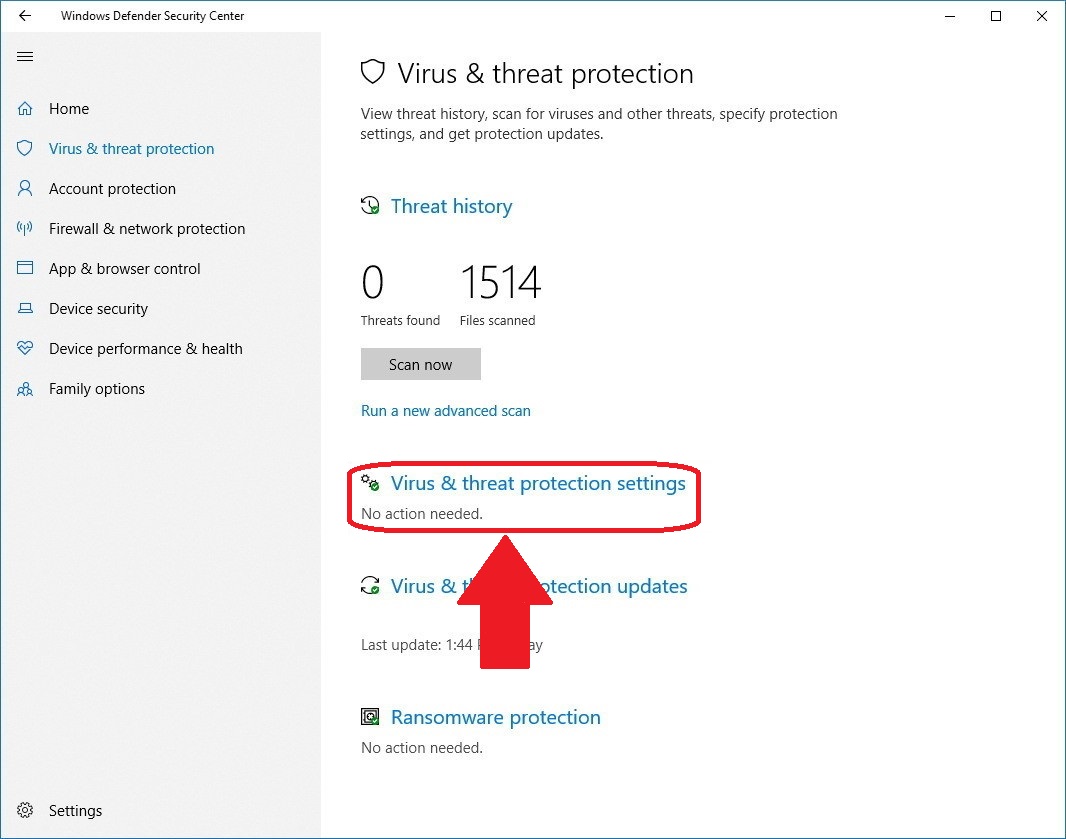
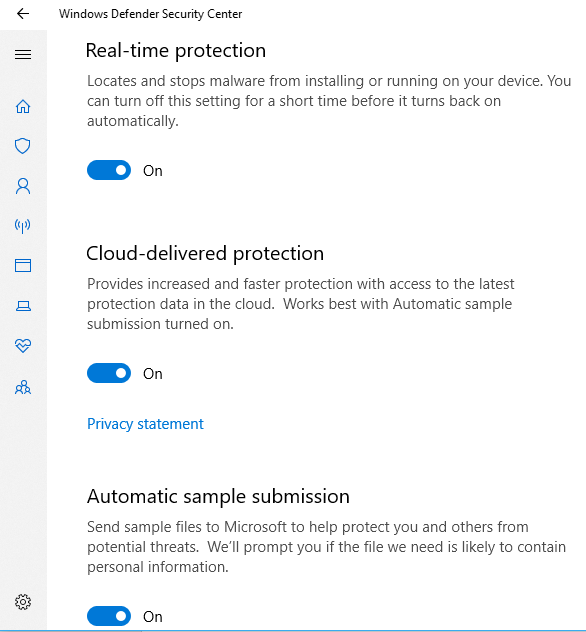
Step – 6: Now turn off all settings in this menu which includes Real-Time Protection, Cloud-Delivered Protection, and Automatic Sample Submission.
That’s it!! After this, your Computer’s Windows Defender Services will be temporarily disabled. This will give you enough time period to complete your work or install any software. This is a temporary solution so when you restart your computer, windows defender services will be automatically turned on.
ALSO CHECK – How to Temporarily Disable or Turn Off Avast Antivirus?
Method 2: Disabling Widows Defender Using Local Group Policy Editor
[wp_ad_camp_3]
If you are using Windows 10 Pro, Education, or Enterprise, you can use the Local Group Policy Editor to disable Windows Defender Antivirus on your computer. This is a Permanent method and if you follow it in proper manner then the Window Defender will turn off permanently, though, you can enable it back by following the reverse process. 😉
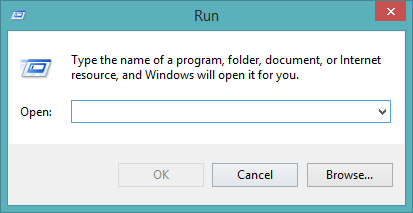
Step – 1: First of all, Press Window Key + R to open Run command.
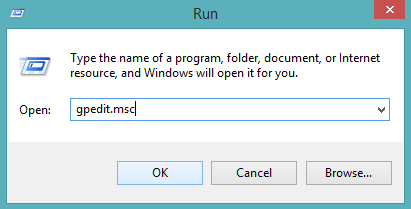
Step – 2: Now type gpedit.msc and click on OK or press Enter.
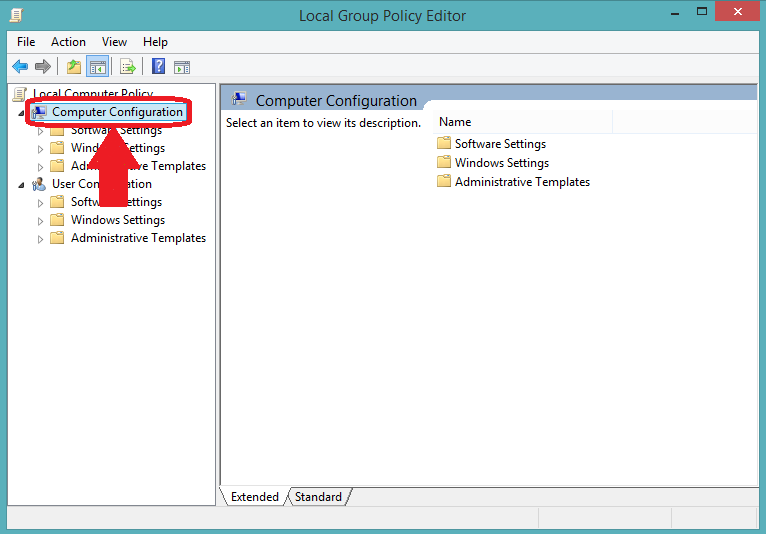
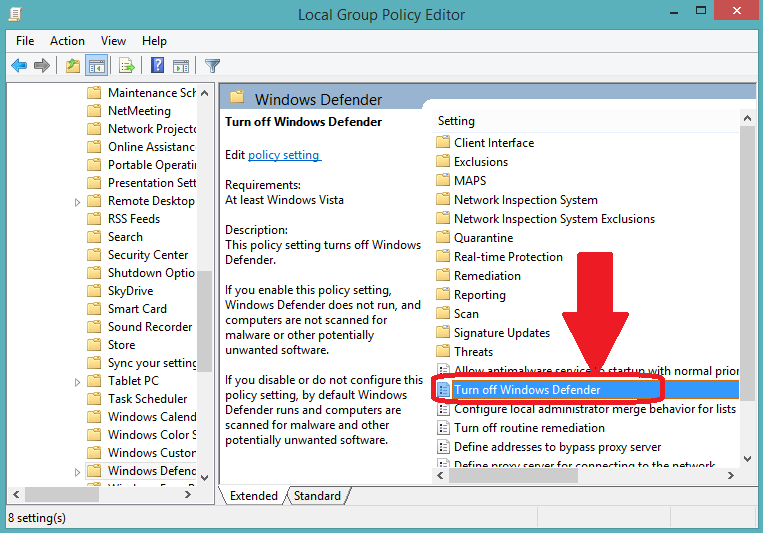
Step – 3: In the Local Group Policy Editor, click on Computer Configuration available in the left panel.
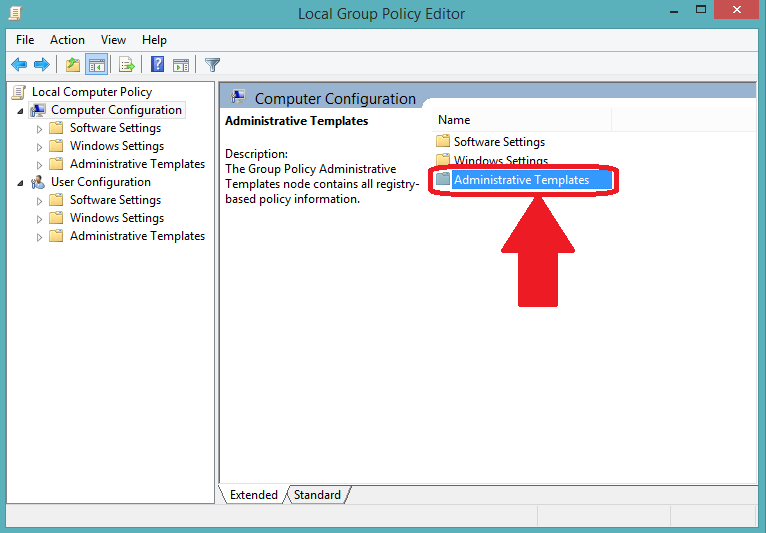
Step – 4: After that double click on Administrative Templates in the right pane.
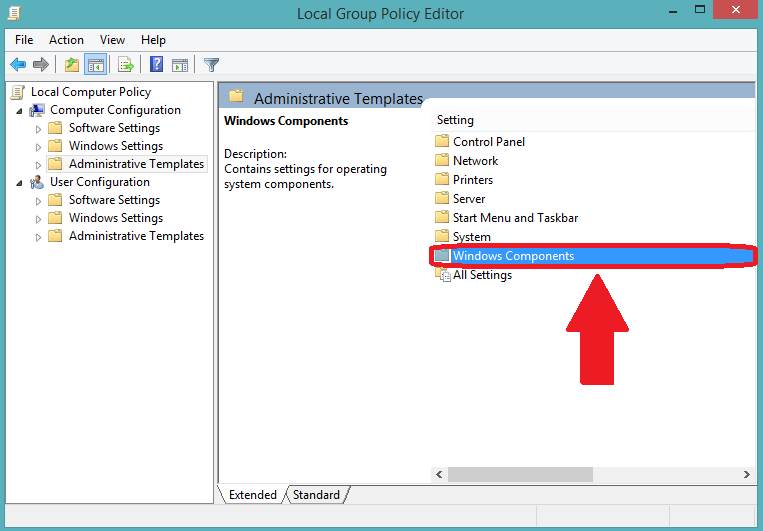
Step – 5: Then double click on Windows Components to expand the list of components available on your computer.
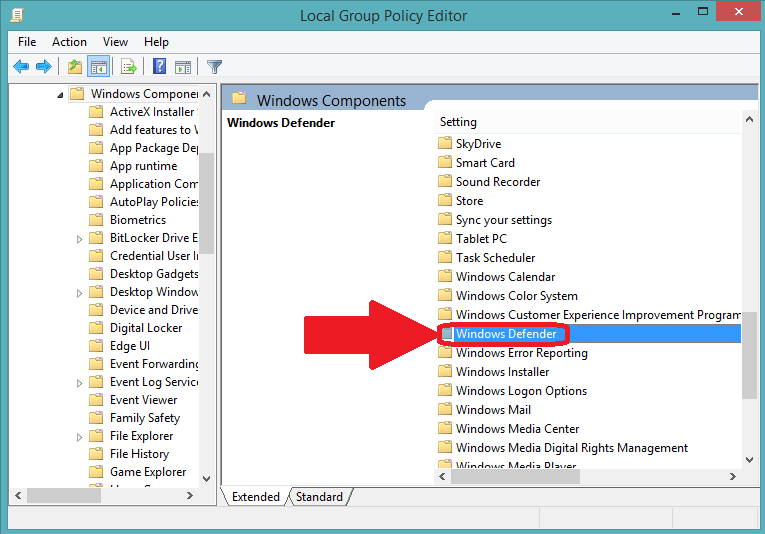
Step – 6: Now click and open Windows Defender Antivirus or Window Defender from the components list.
Step – 7: Double click on Turn off Windows Defender Antivirus/Turn off Windows Defender.
Step – 8: A new dialogue windows will pop-up named “Turn off Windows Defender”. This is where the we have to make the changes. Just select the option “Enabled” and then click on Apply and tap OK.
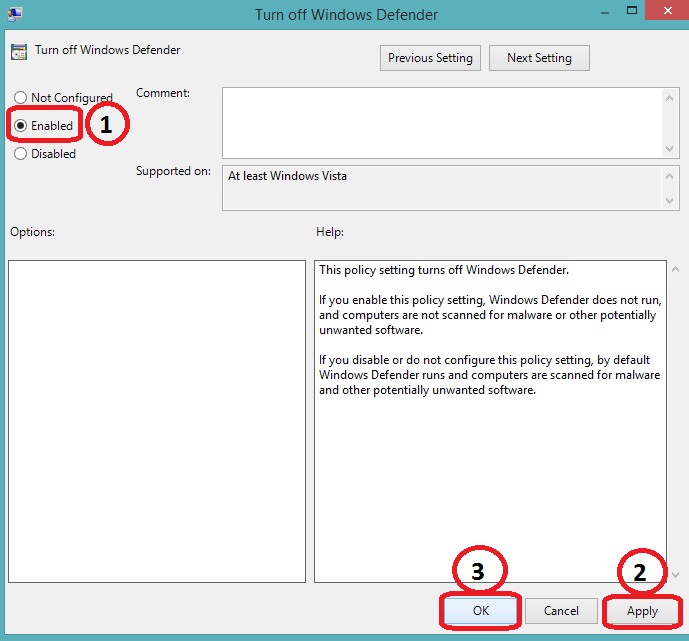
That’s it!! Your Window Defender will be completely turned off until you turn it on by yourself. To turn the Window Defender ON, just follow all the steps till Step 7 and then click on the Not Configured button and apply the changes and your Windows Defender will be reactivated.
RECOMMENDED – What is WSAPPX & How to Fix High Disk & CPU Usage by it in Windows 10?
Method 3: Disabling Windows Defender Using Registry Editor
If you are facing any issues or problems in following the above two solutions then you can try this method. In this method, we are going edit the registry to disable the Windows Defender Program. Make sure you follow all the steps carefully and properly because even a small mistake can cause a lot of trouble to you. If you are properly ready for this method then try it but make sure you backup your important data because messing with Registry can lead you to some serious problem.
Step – 1: First of all, Press Window Key + R to open Run command.
Step – 2: Now type regedit and click on OK or press Enter.

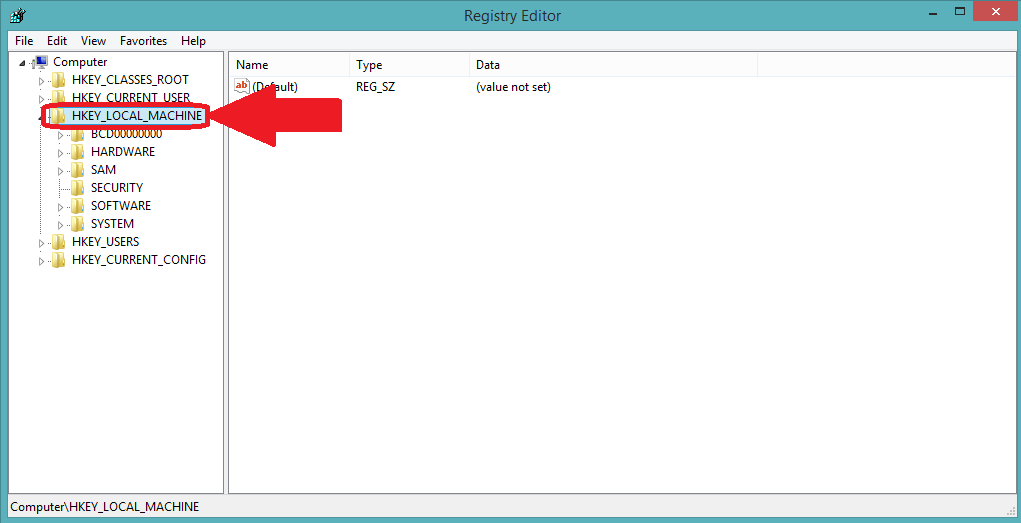
Step – 3: Now in the Registry Editor left panel, double click and expand HKEY_LOCAL_MACHINE option.
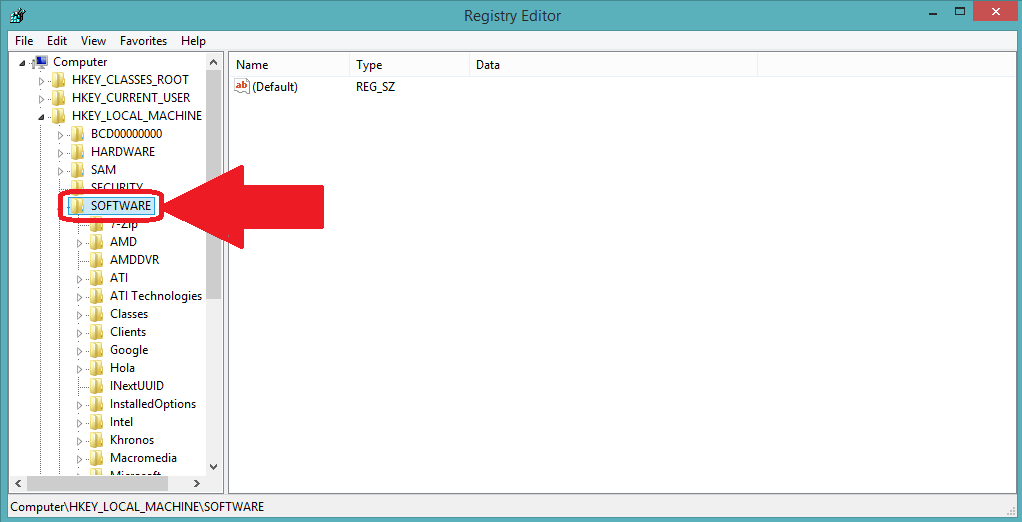
Step – 4: After that double click on Software.
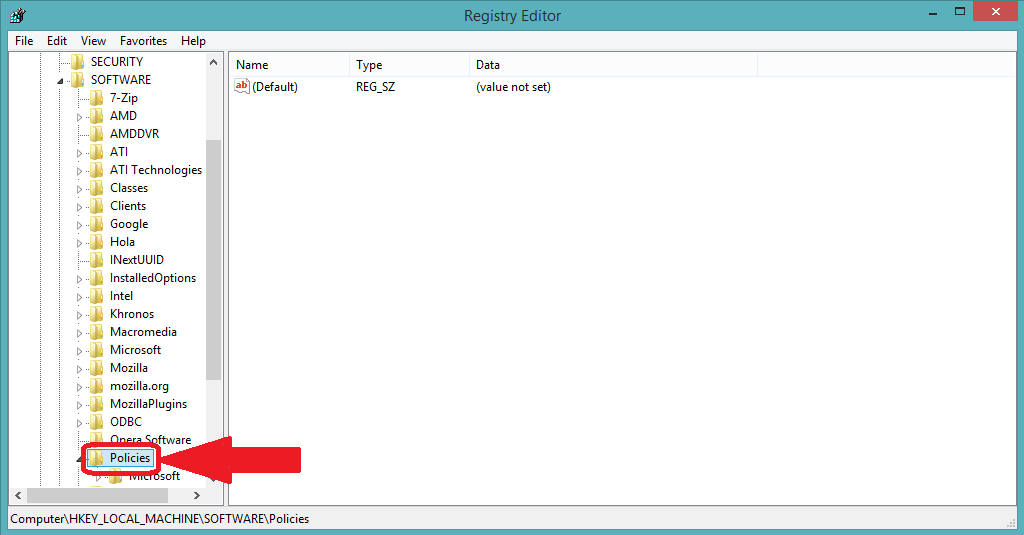
Step – 5: Again from the expanded list, find and double click on Policies.
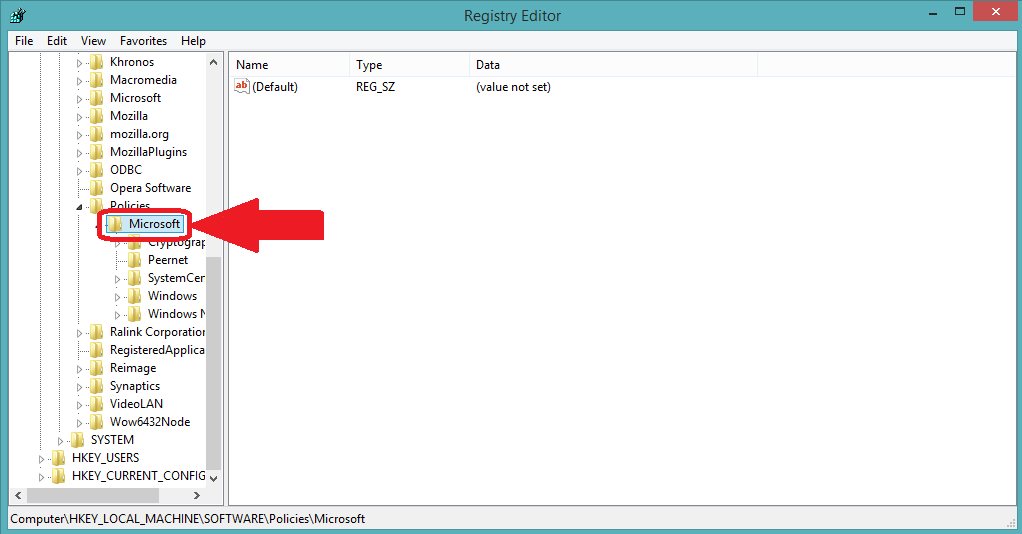
Step – 6: Now double click on Microsoft.
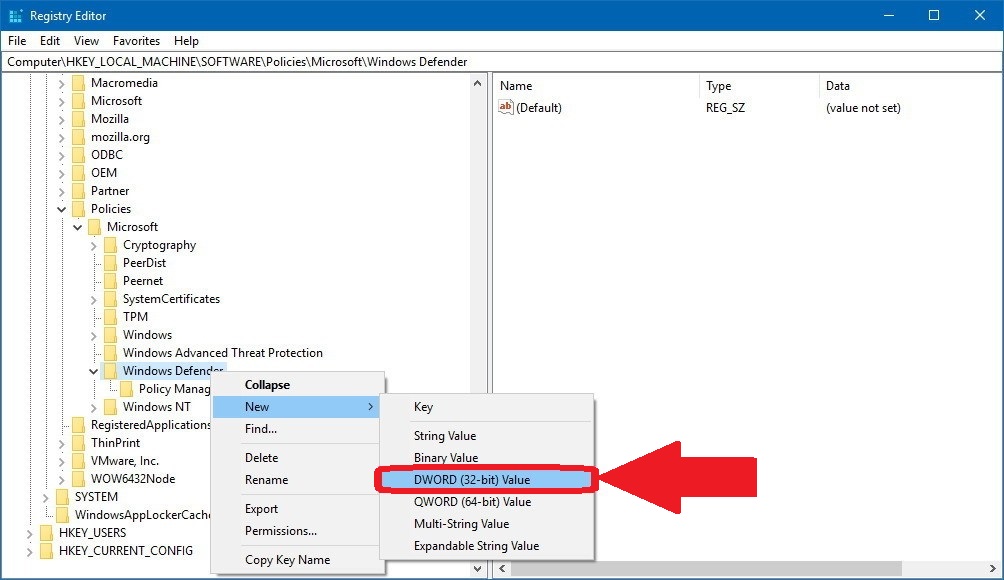
Step – 7: Finally, you will get the Window Defender option. Right click on Window Defender Folder and click on New >> DWORD (32-bit) Value.
[wp_ad_camp_5]
Step – 8: Name the key DisableAntiSpyware and press Enter.
Step – 9: After that double click the newly created file and set the value from 0 to 1 and click on OK.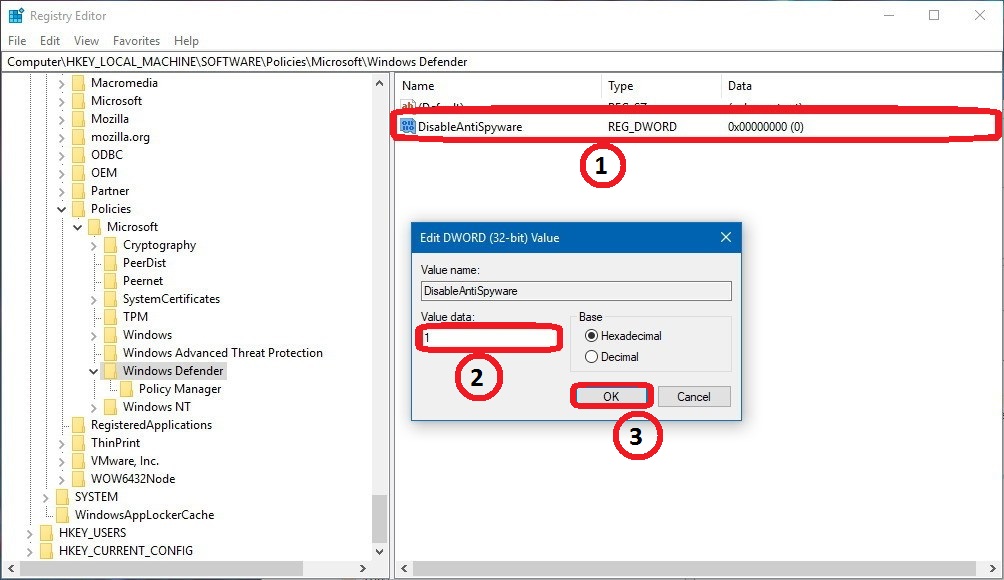
That’s it!! This is how the registry editor is used to change the values and turn off Windows Defender. Now restart your Computer so that essential changes can take place.
ALSO READ – How to Remove or Uninstall Avast SafeZone Browser Completely?
Wrapping up…
That’s it guys!! We hope this will help you and we have given the best methods to Turn off or Disable Windows Defender in Windows 10, Windows 8 and Windows 7. Just make sure you follow all the steps carefully, especially while following solution 2 and solution 3 in the post. Any changes in Registry Editor can harm your Computer in many ways. so make sure that you backup your data before trying the methods. Although all solutions are checked but we do not gurantee that they will work for you. Anyways, Make sure that you have any third party antivirus installed already so that your computer will remain safe.
If you have any question regarding this Guide, feel free to discuss through the comments below. Till then, we are preparing another guide. See you, Bye! 🙂