
Do you want to Overclock your computer monitor? Then this article is for you. You must have heard about overclocking of processor or graphics card to increase it’s performance. The same thing applies when we talk about overclocking of Monitor. If you have never done overclocking then it can be overwhelming for you to digest all the information which is there on the internet. Don’t worry we are here to help you. In this article, we will tell you How to Overclock Computer Monitor and answer all your queries.
[toc]
What is Overclocking?
Overclocking your Monitor means increasing your monitor’s refresh rate beyond the stock rating. If your monitor has an increased refresh rate then it can draw more frames on the screen per second. An overclocked monitor will display better graphics and will work more smoothly. I know you have many other questions, keep reading this article and all your queries will be answered.
CHECKOUT – How to Quickly Fix Steam Friends Network Unreachable Error?
What is Refresh Rate?
Refresh Rate in simple terms means the number of times an image or frame on the screen has been reproduced in a single second. Most monitors come with a 60Hz rate. So, it means that a 60Hz monitor will have the ability to refresh any image 60 times per second. While a 75Hz will refresh the image 75 times per second and a 144Hz screen will regenerate 144 times per second. Higher the Refresh rate, better the experience.
Is Overclocking Safe?
You must have heard people saying Overclocking is not Safe? Which is true to a certain extent. But, if you know the correct method of overclocking then it won’t harm your computer very much. Although, strange things can happen to your monitor after overclocking. You should know the capabilities of your monitor. Tremendously increasing the refresh rate can cause frame skipping or black screen. If this ever happens to you, boot your computer to safe mode and reset the refresh rate or simply reduce it. Most importantly, check if your warranty covers this overclocking process. If the warranty does not cover then you would be doing this process at your own risk or you should avoid doing it at all. Anyways, there are many advantages too which you already know of and therefore you are here to know how to overclock. Let’s proceed!
Can my monitor do overclocking?
You need to check the specs of your panel to determine if you can do overclocking or not. Your friends may have done overclocking but, you might not be lucky enough to do it. Some monitors are already overclocked, they come that way, so, it won’t have the ability to do more overclocking.
ALSO CHECK – Top 10 Methods to Fix PUBG Mobile Lag in Gameloop Emulator
Positives of Overclocking a Monitor
Overclocking increases the performance of your monitor and graphics are enhanced. It also helps you to save money. Rather than spending a lot of money on buying an expensive monitor you can tweak some settings and make your current monitor more powerful. You won’t face any lag, and the monitor would be smooth as butter. I know you are excited to Overclock your monitor. We will soon tell you about it but, let’s first understand the negatives of Overclocking.
Negatives of Overclocking a Monitor
After reading the positives you must have decided to perform overclocking. But, you should also understand the negatives of it. Overclocking increases the performance which means it will also increase power consumption. If you don’t mind paying a higher electricity bill then it won’t be a big thing for you. You will also notice instability in your hardware. As your monitor is exceeding its limit and working continuously without any break your computer will become a little slower.
YOU MAY ALSO LIKE – Best iOS Emulators to run iOS or iPhone Apps on Windows PC
Let’s Prepare the Monitor for Overclocking
Cables play a very crucial role in overclocking your Monitor. Older monitors won’t have the ability to be overclocked or will have lesser Refresh Rates. Search about your monitors model and understand what it supports. Different cables have different bandwidth and the ability to perform overclocking. If you use dual-port DVI links then it would be easier for you to do overclocking than HDMI cables. Cable Adapters are also very important. Always opt for Adapters which are of higher quality.
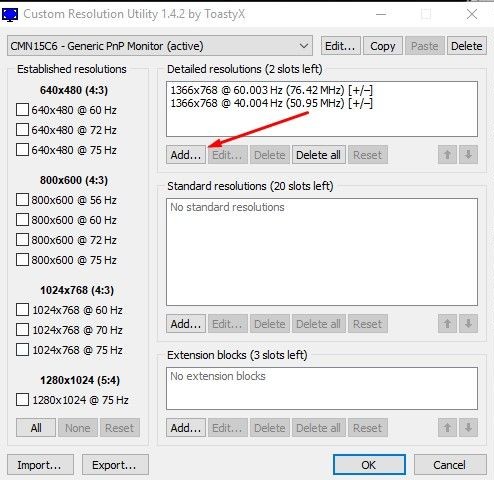
Method 1: Use The CRU (Custom Resolution Utility)
The Custom Resolution Utility is a very old method and it might not be compatible with integrated Intel graphics or with other GPUs. This software is provided by ToastyX and apart from increasing the Refresh Rates you can do a lot of other things. Follow the steps given below:
- You can download the CRU from MonitorTests.
- Once you have downloaded it unzip the file and open CRU.exe file.

- In the Detailed Resolutions tab if you are using multiple displays choose the display you want to use and click on Add.

- Click on Timing and then you need to change it to LCD standard.
- You can increase the Refresh rate here. For starting you can increase it by 5Hz.
- Hit OK and Restart your computer.

The new changes should get applied to your system. In case if the changes are not enabled by default, follow these steps:
- First, you need to right-click anywhere on the desktop.
- Open Display Settings and then click on Advanced Display Settings.
- Scroll down and find the Display Adapter Properties.
- On the Monitor tab from the drop-down menu, you can select the desired Refresh Rate.
If the settings were applied properly, then your screen won’t go black. On the other hand, if the Refresh Rate was too high the screen won’t display anything. After 15 seconds the monitor will revert to it’s default settings.
MUST READ – How to Use PS4 Controller on PC? – 4 Quickest Working Methods
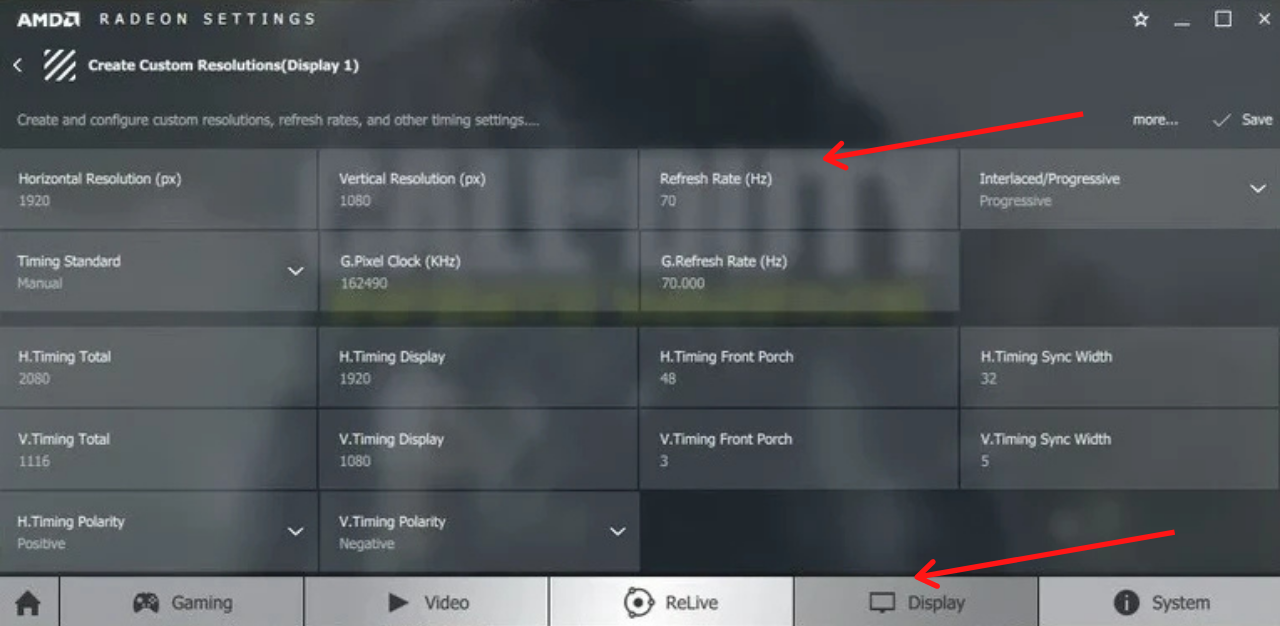
Method 2: Use AMD Radeon Settings
If you are using an AMD graphics card then you will use the AMD Radeon Settings panel for overclocking. Check if it is installed on your computer or not. If it is not installed then go to AMD’s website in order to download the utility. After downloading it follow the instructions given below:
- Right-click anywhere on your desktop and select the AMD Radeon Settings from the drop-down menu.
- Click on the Display Tab which is available at the bottom.

- Click on Create option which is there next to custom resolutions.
- Change the Refresh Rate according to your choice.
- Hit the Save button and Restart your computer.
The Settings should get enabled. Use your computer for some time and check if everything is working smoothly or not. If you are facing some problem then you can follow the steps given above to revert to default settings.
CHECK THIS – How to Fix Second Monitor Not Detected in Windows?
Method 3: Use the NVIDIA Control Panel
If you are using the NVIDIA graphics card then open the NVIDIA control panel and follow these steps to overclock your monitor:
- Right-click anywhere on your desktop and select the NVIDIA control panel.
- From the menu of options, you need to open the Display Tab.
- Click on the Change Resolution option.
- Adjust the Refresh Rate in the Custom Resolution option.
- Save the changes.
In the NVIDIA Control Panel, you can test the settings before applying them. This will help you finalize the best setting for your monitor.
WINDOWS USER? THEN DON’T MISS THIS – How to Create a System Restore Point in Windows 10?
Method 4: Use the Intel HD Graphics Control Panel
Users of Intel Graphics Card can Overclock their monitor using the Intel HD Graphics Control Panel. It would be pre-installed on your computer. Here is how you can overclock your monitor using Intel Graphics:
- Open your Intel HD graphics control panel and select Display.
- Click on Custom Resolutions which is available on the left side.
- Here, you need to enter the width, height and Refresh Rate.
- Once you entered all the things hit the Add button which is available at the bottom.


If you have put up a very high Refresh Rate and your Display can’t handle it then you will have to either quit or try again. On the other hand, if everything is fine Restart your computer.
How to Check if you have Successfully Overclocked your Monitor?
Done with Overclocking your Monitor? Let’s verify if you have successfully overclocked your monitor or not. A simple way is to play different games. If you notice that your gameplay is very smooth or you have stunning graphics then my friend you have successfully overclocked your monitor. But, if you see lines on your screen or something unusual then you need to revert to default settings. You can also run an Online Test. Visit this Website and follow the on-screen instructions. It will tell you the Refresh Rate which you are using on your computer at that time.
READ THIS – [Solved] CS:GO Error VAC Was Unable To Verify Your Game Session
Concluding…
If you have followed all the above steps properly then you must have overclocked your monitor easily. We highly recommend you not to increase the Refresh Rate tremendously and take this process slowly. Play with the settings safely and you shouldn’t face any problem on your monitor. As told before in this article overclocking might void your warranty so, do everything at your own risk. Are you a pro in this stuff? Do tell us some tips and tricks in the comments section. If you have any query write about it in the comments. We will surely respond with a solution. We hope that this article was helpful for you.