
The Critical Process Died or BSOD is a very frustrating message that always pops up when you are doing some important work. This Error usually results in your computer getting rebooted several times. Do you know there are more than 500 BSOD error codes? Yes, that’s a very big number. But, the ‘CRITICAL_PROCESS_DIED’ Error is faced by many Windows users. Even we faced this terrible issue. After researching a lot we finally found some solutions which will help you a lot. In this article, we will tell you How To Fix the ‘Critical Process Died’ Error Permanently in Windows?
[toc]

What does exactly ‘Critical_Process_Die’ mean?
Windows Critical Process Died occurs when critical components of Windows finds out that some data has got corrupted or modified when it should not have been. Most users see this error when they try to upgrade to Windows 10 or when they try to install a new Windows on PCs. Most of the time the Drivers are the root cause for this issue. It has been seen that the error happens to the users of Brand New Computers more than those computers which are running flawlessly for years. This Blue Screen has become a Nightmare for many Windows Users. But, don’t worry we are here for the rescue. Below, we have mentioned some solutions to fix.
Solutions to Fix for ‘Critical Process Died’ Error
- Restart Your Computer In Safe Mode and Perform Reboot
- Update Your Drivers
- Run System File Checker
- Revert Back to the Previous Working State
Method 1 – Restart Your Computer In Safe Mode and Perform Reboot
This error makes your computer unusable and because of this, you need to restart it again and again. To overcome this, restarting your computer in Safe Mode is a better option. Then you can perform a Reboot to resolve this issue. To do this follow the steps given below:
- You need to start your computer in Safe Mode.
- To do this restart your computer and Press Shift + F8 before Windows 10 starts loading.
- This will start your computer in recovery mode from where you can boot into Safe Mode.
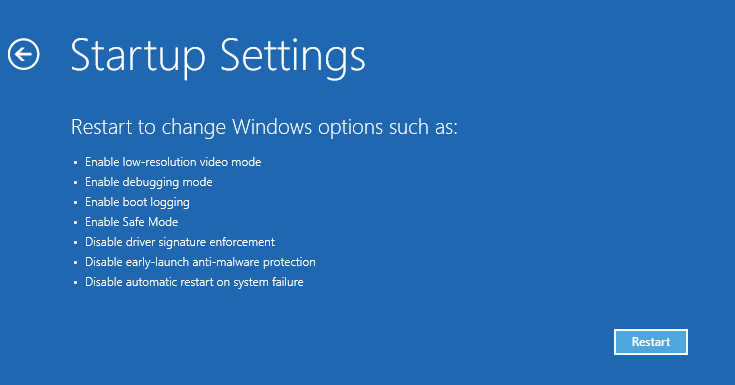
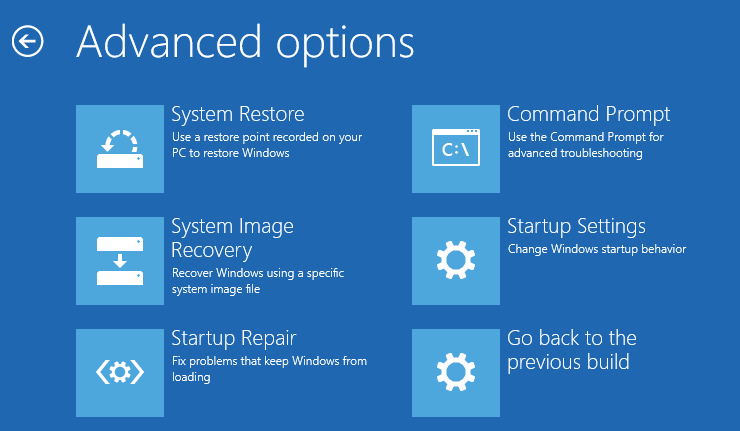
- Then hop over to Advanced Boot Options. Then simply set the boot mode as Safe Mode.

- Your computer will open in Safe Mode. Now, you need to perform Clean Boot.
- In your start menu type msconfig
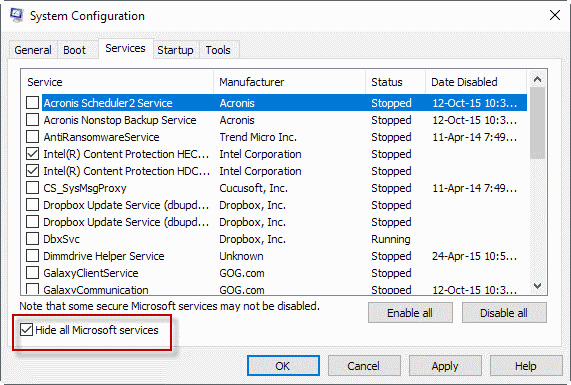
- This will open System Configuration application.
- On the Top, you will find the Services Tab. Click on it and then check the Hide all Microsoft Services option.

- Then go to the Startup Tab which is available on the Top and click Open Task Manager.
- Disable all the services you see and then Restart your Computer.
READ MORE – How to Fix “Unknown USB Device (Device Descriptor Request Failed)” in Windows?
Method 2 – Update Your Drivers
Most of the time outdated drivers cause Critical Process Died’ Blue Screen Error. To update your Drivers follow these steps:
- On your Windows Search Bar type Device Manager.
- You will see a list of all drivers. Check all the Drivers carefully.
- If you see Yellow Exclamation Mark beside the Drivers then it means that Driver needs to be updated.
- Right-click on that driver and choose Update Driver Software.
CHECKOUT – How to Fix “Driver Power State Failure” Error in Windows?
Method 3 – Run System File Checker
If still, you are not able to resolve the problem then this a very handy tool to solve a wide variety of Windows Problems. This tool helps to repair corrupted or incorrectly modified system files. It is a very critical troubleshooting step in resolving this Critical Process Died’ Error.
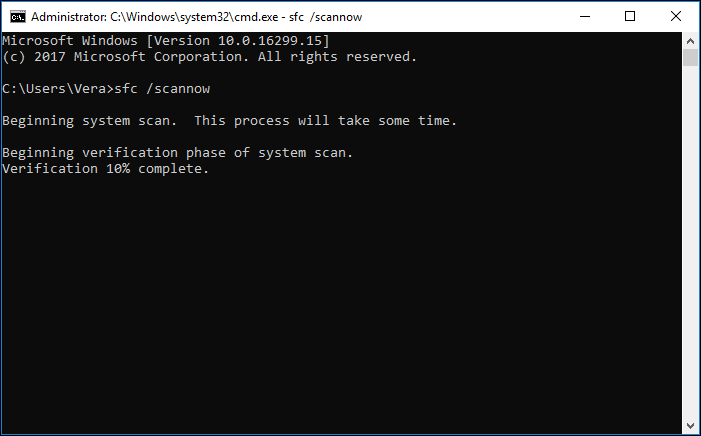
- Type cmd in your Windows Search Bar. Right-click on the result, and select Run as Administrator.
- The Command Prompt will open.
- Type sfc/scannow and hit Enter.

- It will start scanning. The process will take some time.
- Restart your computer.
FIX NOW – How to Fix “NVIDIA Installer Failed” Error in Windows?
Method 4 – Revert Back to the Previous Working State
If this problem has occurred when you have installed an update or a new driver then the best solution would be to revert to the previous working state. You can use System Restore to revert to previous version of Windows. In System Restore, Windows automatically creates backups before every major update or system change.
- Type ‘System Restore’ on your Start Menu.
- You will see a Create a restore point option.
- Click on it to create a point.
- Under System Protection you need to click on System Restore.

- You would be redirected to a new window. You can see all the available rest points. As per your choose you can select any restore point.
- Wait for sometime until Windows make some changes.
Note that Windows won’t delete any of your files. But, it may delete some applications and settings. Windows 10 has a great feature that allows scanning for programs and drivers which would get deleted when you revert to a previous version.
IMPORTANT TOOL – Download Realtek HD Audio Manager for Windows
Concluding…
If you follow all the steps given above correctly then you would be able to solve this problem easily in no time. The best part here is that once you resolve this problem then you won’t face this same problem again. Let us know in the comments below which solution worked for you. Also, if you face any issues while following any of the CRITICAL_PROCESS_DIED solutions then comment below and we would try to help you resolve it.