
Recently users found the ‘Windows Could Not Automatically Detect This Network’s Proxy Settings Error‘ on their Windows Computer. A built in tool known as troubleshooter in Windows helps the user’s find out connectivity problems in their computer. When a problem with your network is found out by the tool it automatically fixes it. Sometimes it recommends you solution for the problem. At certain instances Troubleshooter just describes the problem but does not provide any solutions to fix it. Windows Could Not Automatically Detect This Network’s Proxy Settings Error is an example of this only. In this article we will guide you on How To Fix Windows Could Not Automatically Detect This Network’s Proxy Settings Error.

[toc]
Lets checkout quick fixes or solutions that will help you solve and remove the error Windows could not automatically detect this network’s proxy settings error, which you might be facing in your Windows 10, Windows 8 or Windows 7. The solutions listed might work on any Windows, irrespective of their versions. So try each solutions listed one by one, and let us know in the comments below which worked for you.
Method 1: Restart Your Computer’s Network Adapter
You can try Disabling your Network Adapter on your computer for few seconds to fix this error. This is an easy solution which will help most of you in resolving this error. Follow the steps given below:
- First, you need to go the Settings.
- Then hop over to Network & Internet. Select the Status Option.
- On the right corner you will find Change the Adaptor Option underneath Change Your Network Settings.
- If you are using a Wifi then select the Wifi Option. On the other hand if you are using Ethernet (wired/LAN connection) then choose the Ethernet Option.
- Then hit the Disable this network device which is available on the Top.

- Wait for 1-2 Minute and then click on Enable this network device.

- See, if your error is resolved or not.


THIS MIGHT HELP – How to Quickly Fix “ERR INTERNET DISCONNECTED” Error in Google Chrome?
Method 2: Update or Roll Back Your Network Driver
An outdated Network Driver maybe causing you this error. On the other hand if you have recently updated your drivers and you have faced this issue then you need to Roll Back your Drivers to the previous version.
- First, you need to open the Device Manager.
- To do this right click on the Start button and then select Device Manager.
- Then you need to expand the Network Adapters section.
- Then you need to double click on the Connection you are using.
- Choose the Driver Tab which is available on the top.
- If you faced this issue after updating drivers then select Roll Back Driver to uninstall the latest updates.

- But, if you haven’t updated then select Update Driver.
- You can also download the updates manually from the Manufacturer’s Website.

Method 3: Reset TCP/IP
Resetting the TCP/IP is another effective way to resolve the Windows Could Not Automatically Detect This Network’s Proxy Settings Error. Follow the steps given below:
- Press the X Key and Windows Logo Key on your Keyboard.
- Then you need to select the Command Prompt(Admin).
- Then type netsh int ip reset resetlog.txt in the Command Prompt.
- Restart your computer.
- Hopefully your problem should be resolved. If not follow the other solutions given below.
CHECKOUT – How to Fix “DNS PROBE FINISHED NO INTERNET” Error in Google Chrome?
Method 4: Perform an SFC scan
If still you are seeing the Windows could not Automatically detect this network’s proxy settings message you should perform an SFC Scan.
- Type Command Prompt in the Windows Search Box.
- Run it as Administrator.
- Type the following command: sfc/scannow and hit Enter.
- The SFC Scan will start which will take 10-15 minutes.
- After the Scan is complete Restart your computer.
Method 5: Change Proxy Settings On Your Computer
As this error is mainly caused because of Windows proxy settings then changing or checking it should really help you.
- Press Windows Key + I on your Keyboard in order to open the Settings App.
- Then search for the Network & Internet Option.
- Hit the Proxy Option which is available in the left corner.
- Then turn off the Automatically detect settings option.

- Many users said that Disabling this Option helped them to resolve the Network Proxy Settings Windows 10.

CHECKOUT – How to Fix Windows Stuck on Just A Moment (Install, Update or Reset OS)?
Method 6: Run Network Troubleshooter
As you know Windows has a lot of in-built Troubleshooters which help the users in resolving bugs and errors. For this error also Windows has Network Troubleshooter. Below we have given the steps to Run Network Troubleshooter.
- Press Windows Key + I on your Keyboard in order to open the Settings App.
- Click on the Network and Internet section.
- Choose the Troubleshooter Option which is available on the left corner.
- Select Network Adapter and then click on Run the troubleshooter.
- If there are any problems you will get solutions on the screen. Just follow them and your problem should get resolved.
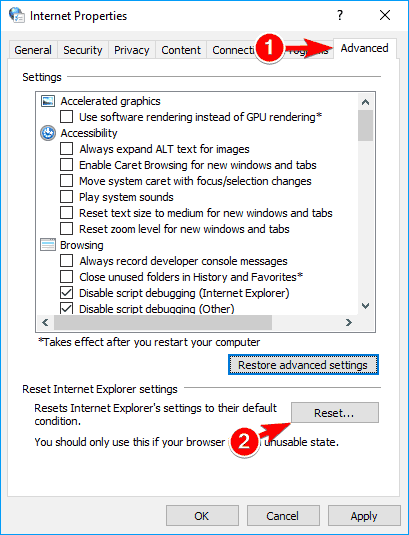
Method 7: Reset Your Internet Settings
After all the Solutions if still the problem is there on the computer then we recommend resetting your Internet Settings.
- Type Internet Options on your Windows Search Box.
- Hit the Internet Options from the menu.
- Go to the Advanced Tab which is available on the Top and then click on Reset.

- If you want you can clear your personal data by checking the Delete Personal Settings.
- This is Optional: Click on Restore advanced settings.
- Then hit the Apply Button and click on OK.
CHECKOUT – How to Fix “Your Connection is Not Private” Error in Google Chrome?
Concluding…
As you can see you can easily resolve the Windows Could Not Automatically Detect This Network’s Proxy Settings Error in just few steps. We recommend you to follow the Solutions in chronological order. If you have any other method to solve this problem you can mention it in the comments section.