
Are the Windows 10 Automatic Updates Feature causing you problem? Then this article is for you. Fortunately, in Windows 10 you can disable this feature. Although this feature is really good for novice users it is the least liked feature of Windows 10. Read this article till the end to know How to Turn Off Automatic Updates in Windows 10 without any complications.
[toc]
Why People Don’t Like The Automatic Updates Feature in Windows 10?
Automatic Updates Feature downloads all the important security updates, bring exciting features and improves the performance of your computer. All these things sound great right? Why people still don’t like this feature? Although updates ensure the smooth running of your computer it contains a lot of bugs or errors. Due to these updates, your computer may not perform properly. We have seen this many times where updates cause BSOD Errors, Compatibility problems, etc. As you know BSOD Errors are a nightmare for Windows Users. Many users face serious problems due to updates. It takes a lot of time to resolve these problems. See, if you face a lot of problems due to updates rather than benefits then you can disable this feature. Below, we have mentioned all the effective ways to Turn Off Automatic Updates in Windows 10.
NOTE: Automatic Updates can be problematic sometimes, but not updating your system for a longer period of time can cause you a lot of problems. After Disabling this feature keep checking for updates manually.
How to Pause Automatic Updates Temporarily?
If you want to skip any updates for a certain period of time then you don’t need to disable this feature permanently. Instead, you can pause it for some time. Windows provides you with an option to pause the updates for up to 35 days on both Windows Home and Pro. Follow the steps given below to disable automatic updates temporarily.
- Press the Windows Logo Key and I Key simultaneously on your keyboard to launch Settings.
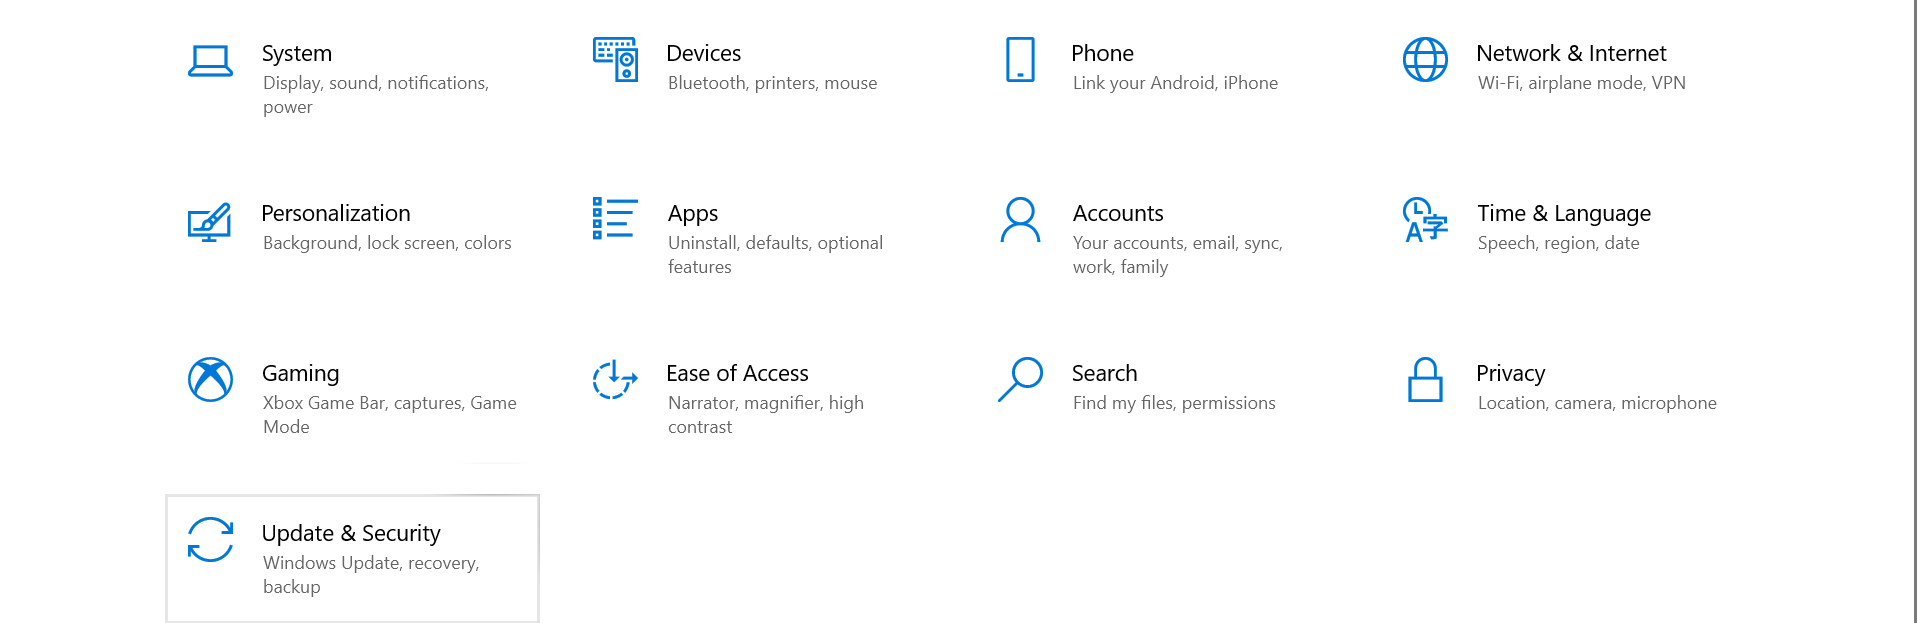
- Click on the Update and Security option.

- On the left side click on the Windows Update.
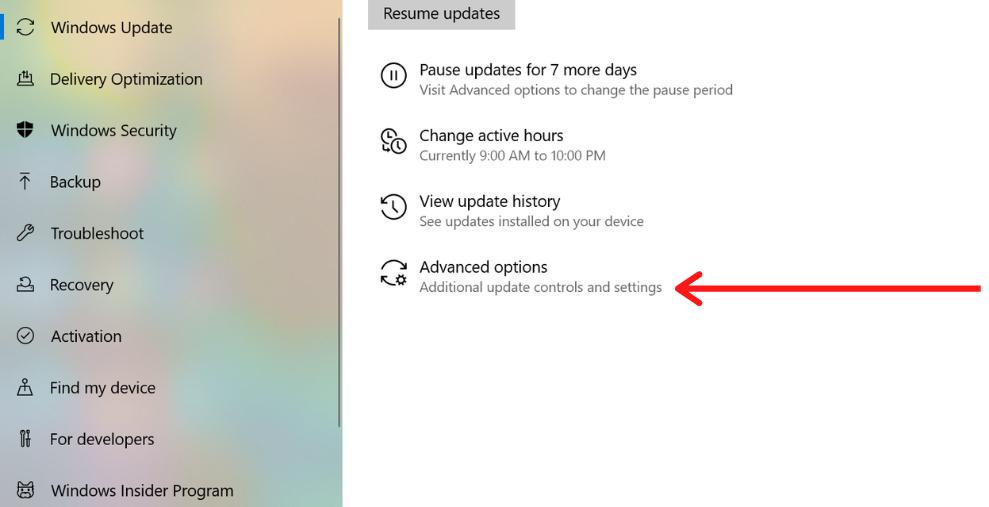
- Hit the Advanced options.

- Under the Pause Updates section, you need to click on the drop-down menu and select when you want to pause the updates.
Updates will not be downloaded until it reaches the day you have specified. If you want to change the pause period follow the exact steps again. In case you want to download and install the updates hit the Resume updates button in the Settings on the Updates Page.
CHECKOUT – Realtek PCIe GBE Family Controller Not Working? Try these Fixes!
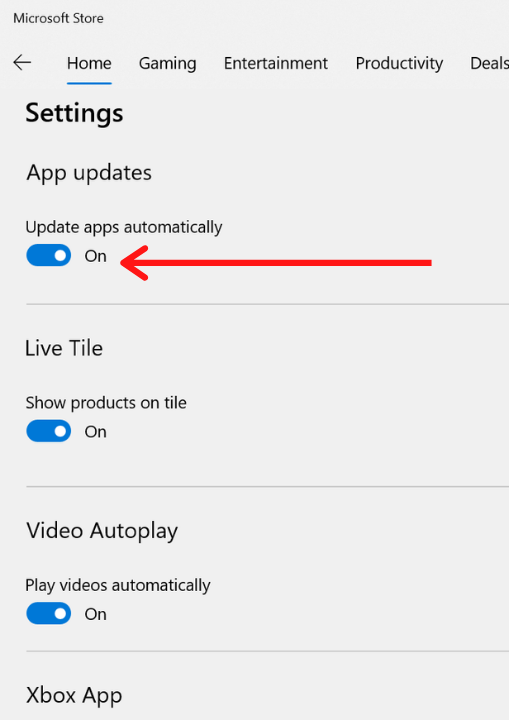
Disable Automatic Windows Store App Updates
You can easily disable the Automatic Windows Store App Updates by following the steps given below:
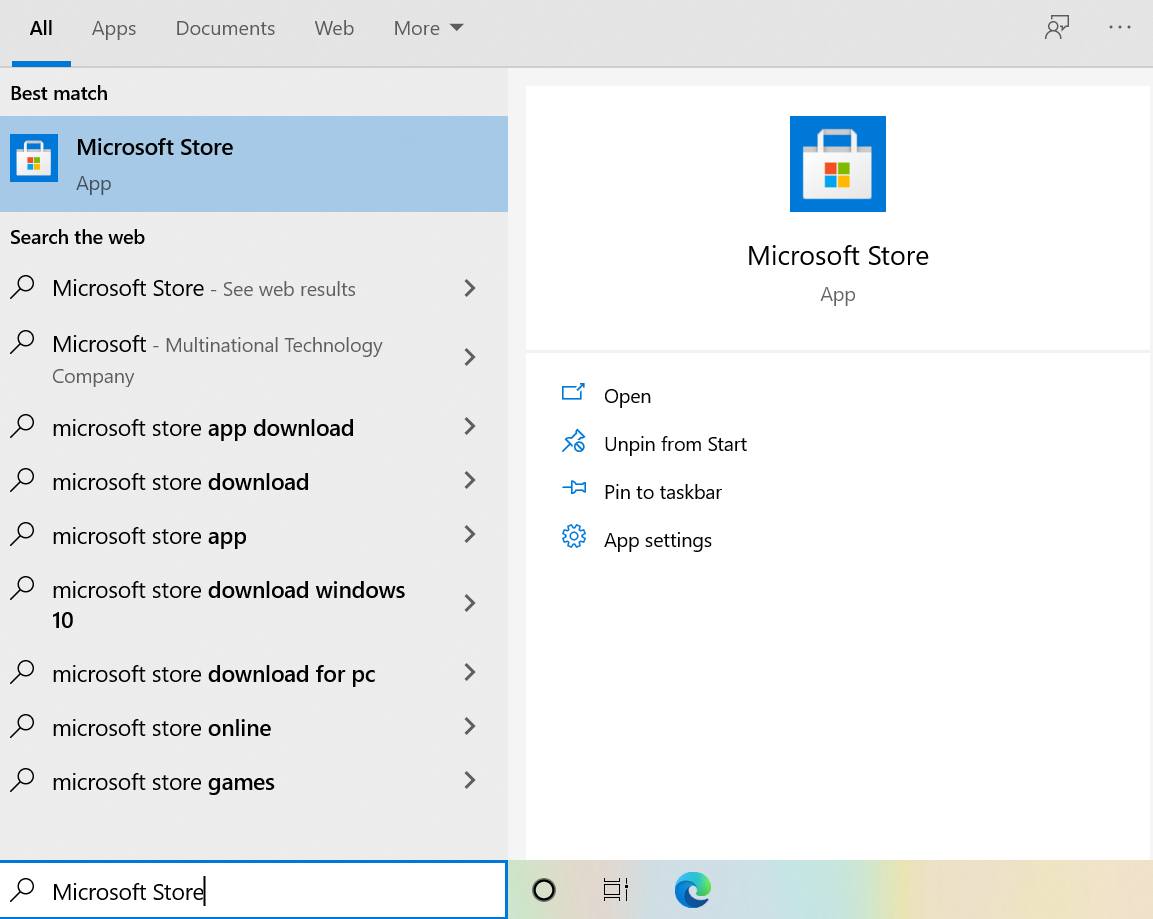
- On your Windows Search Box type Microsoft Store and click on the first option.

- Click on the three dots which is there on the top-right corner of your screen.
- Click on the Settings option from the drop-down menu.

- Turn the Update apps automatically toggle OFF.


Checkout – How to Fix Microsoft Store Not Opening in Windows 10?
How to Permanently Turn Off Automatic Updates in Windows 10?
If you are looking to disable the Automatic Updates permanently then follow the methods given below. We have mentioned everything in a simplified manner so you can follow them easily. Follow the methods in Chronological Order.
Method 1: Disable the Windows Update Service
This is one of the easiest and fastest ways to disable the Automatic Updates feature. The only limitation of the method is that the service will re-enable itself after a certain period of time.
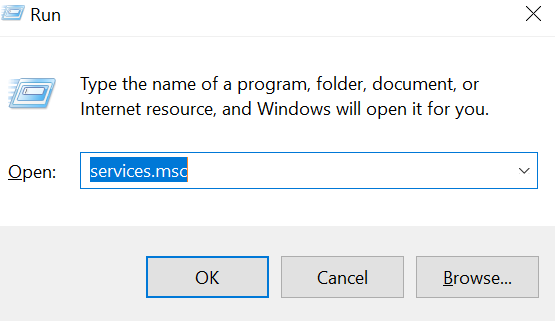
- Press the Windows Logo Key and R Key simultaneously on your keyboard to launch the Run Box
- In the box type services.msc and hit Enter.

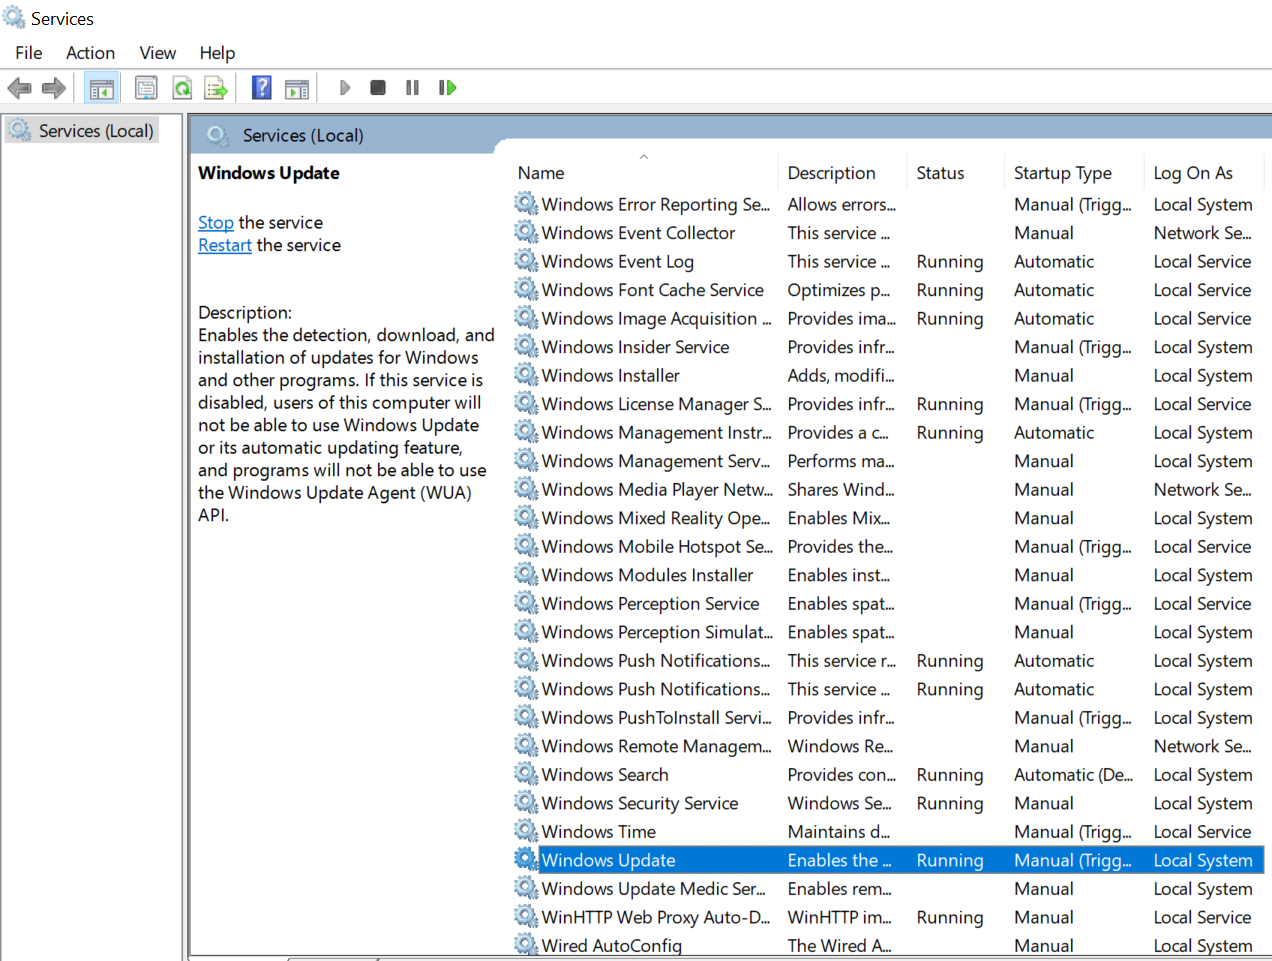
- Scroll down and find the Windows Update option.

- Double-click on it and you would be redirected to the Windows Update Property ( Local Computer) Window.
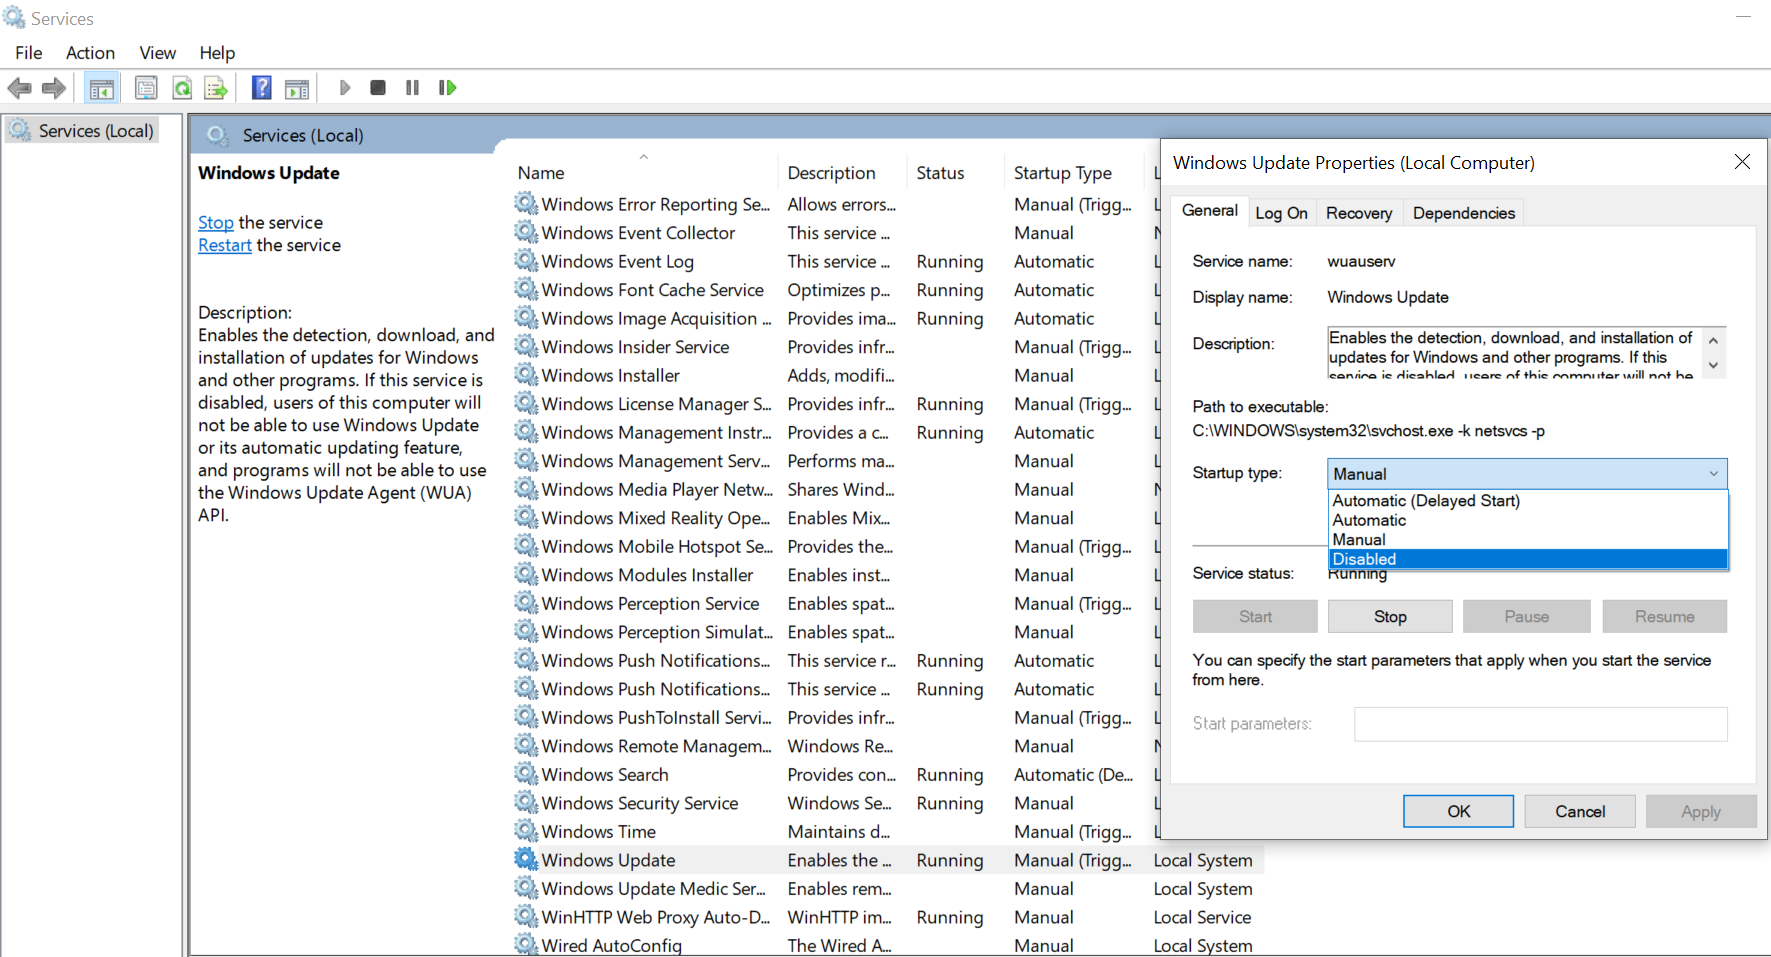
- Click on the General tab which is available on the top.
- Click on the Startup Type drop-down menu and select the Disabled option.

- Click on Apply and OK to save the changes.
- To re-enable this feature again repeat the above steps again. In the Startup Type (Step 6) select Automatic and click on Apply and OK.
ALSO CHECK – [Fixed] The Active Directory Domain Services is Currently Unavailable
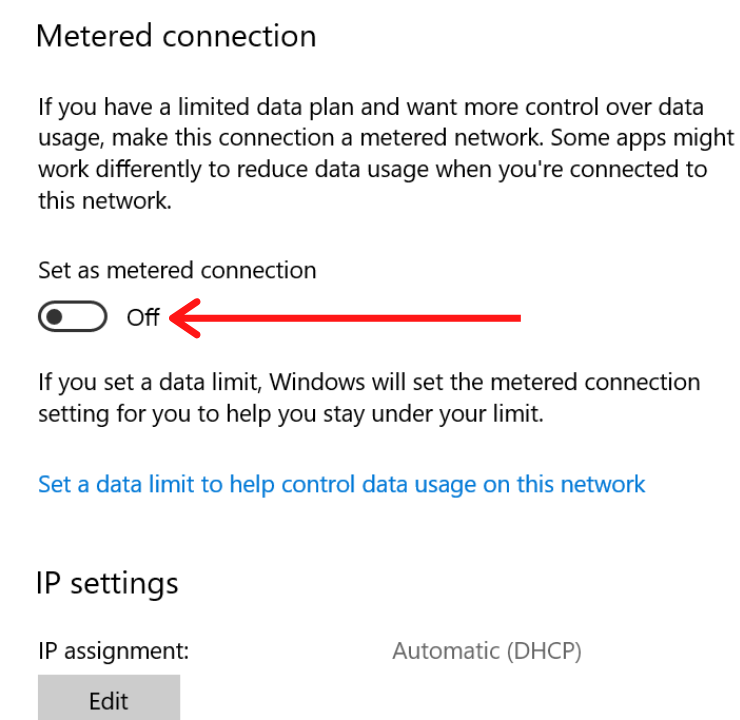
Method 2: Set Up a Metered Connection
If you are using a Wifi Connection then you can use this method to disable Automatic Updates. This method won’t work if you are using Ethernet Connections. Follow the instructions given below:
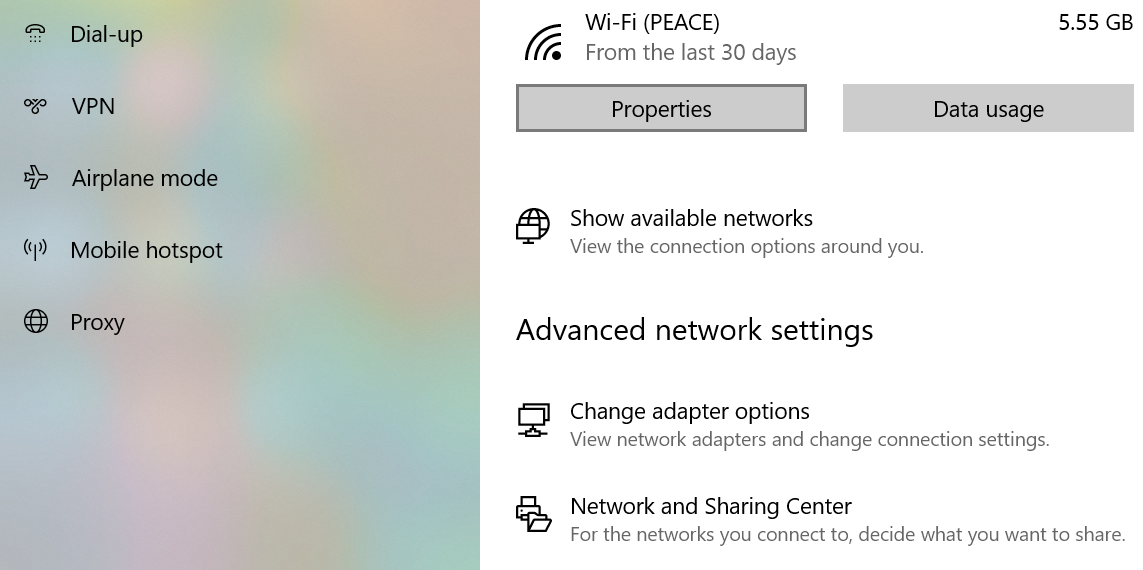
- Open Settings on your computer by pressing Windows Logo Key and I Key.
- Click on the Network and Internet option.
- Hit the Wi-fi option from the left side.
- Below your Wi-fi connection name click on Properties button.

- Toggle the Set as Metered Connection option to ON by clicking on it.

Method 3: Use the Group Policy Editor
If you are using the Windows 10 Pro, Education or Enterprise Editions then you can use the Group Policy Editor to disable this feature. On the other hand if you are using the Windows 10 Home Edition then unfortunately you can’t use this method. If you are using this solution note that security updates will still be installed on your computer. You will be notified for other updates when they are ready to be installed. This is how Windows used to work before but, now it has changed it’s way to install updates.
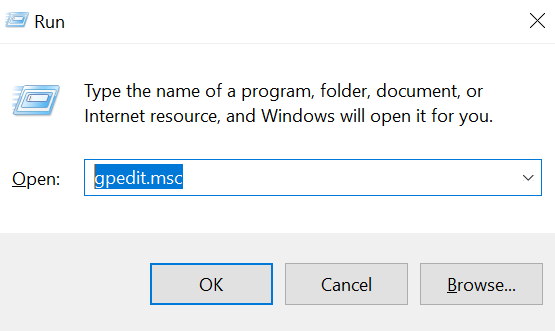
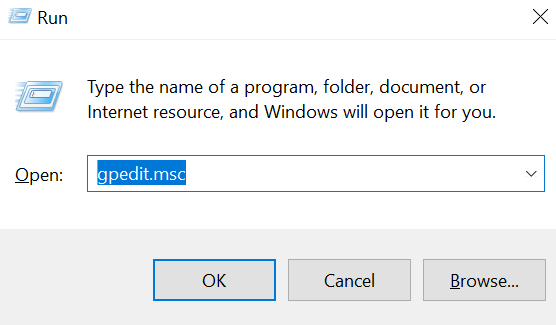
- Launch the Run Command by pressing the Windows Logo Key and R Key.
- In the Run Box type gpedit.msc and press the Enter Key.

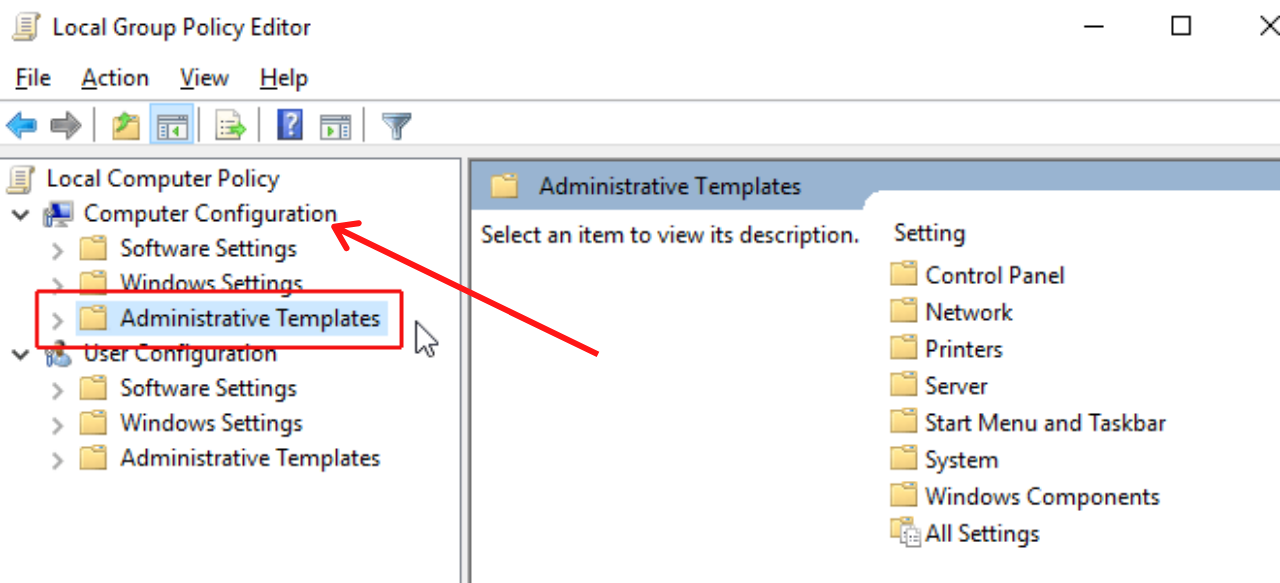
- Double-click on the Computer Configuration option which is available on the left.
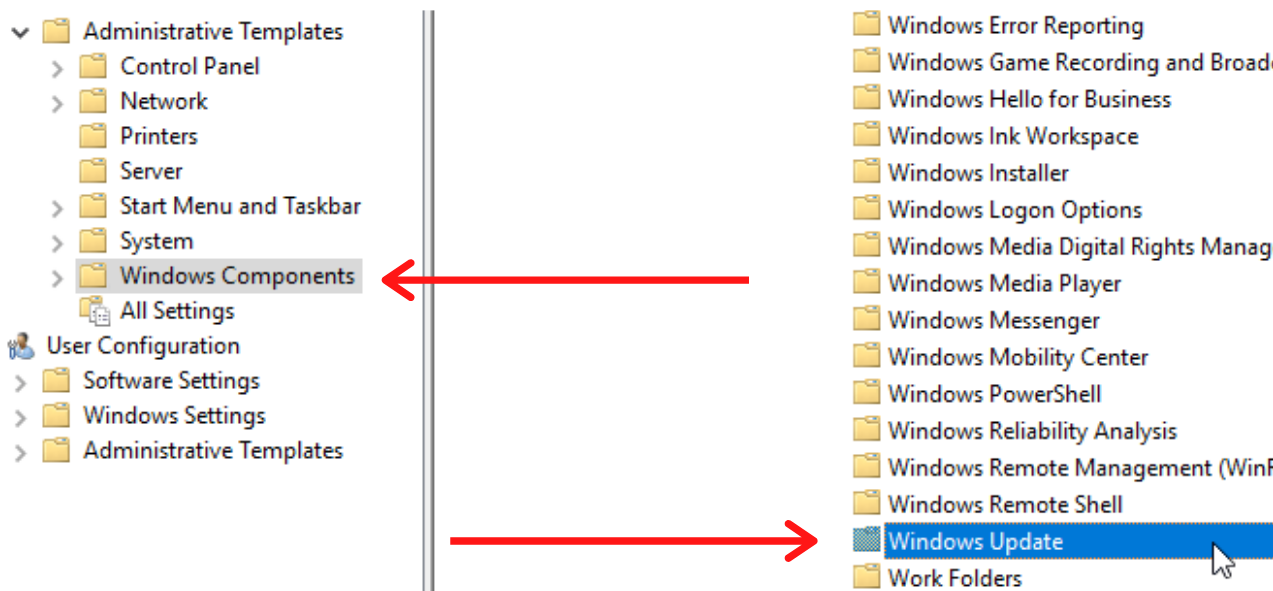
- Now, you need to Double-click on the Administrative Templates folder.

- Finally, double-click on the Windows Components folder.
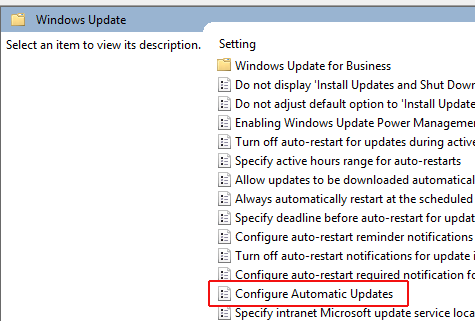
- Scroll down and click on Windows Update.

- Double-click on the Configure Automatic Updates policy which is there in the middle of the screen and select Edit.
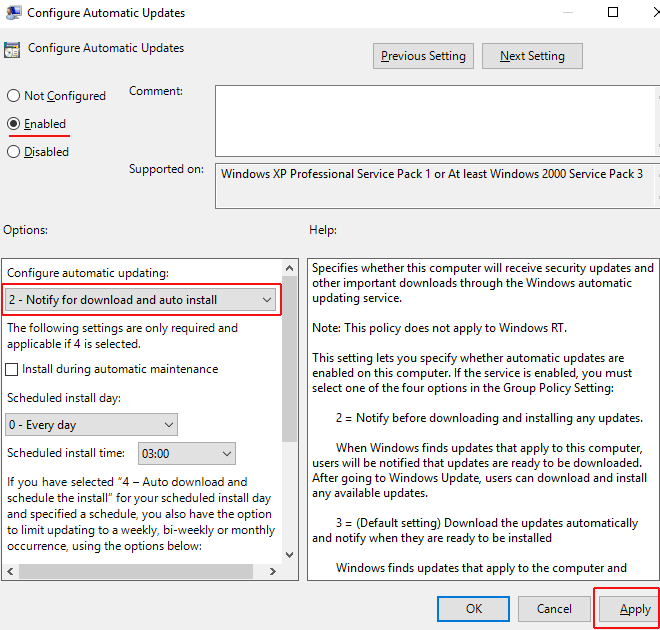
- Check the Enabled option and then click on Configure automatic updating.

- Select the Notify for download and notify for install option from the drop-down menu. If you select this option Windows will ask you before installing the updates.

- Click on Apply and OK to save the changes.
- Restart your computer.
- Now, Windows should ask you before installing updates on your computer.
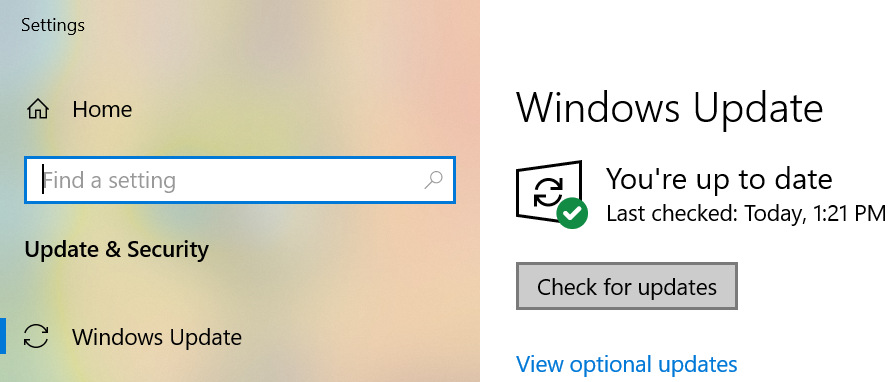
- If you want to check if there are any updates available type Updates on your Windows Search Box.

- Click on the top result which appears on your screen.
- Click on the Check for Updates button.

- Windows will identify the updates if they are available but, it won’t install them on your computer.

YOU MAY ALSO LIKE – [FIXED] Windows 10 KB5003173 Update Fails With Error 0x800f0922
Method 4: Use the Registry
You can use the Registry to disable the Automatic Updates but, it’s very risky. Instead, use the methods which are mentioned above. If still, you are not able to disable the Automatic Updates using the above methods then you can use this method.
Alert: This method is very risky. Even if you make a very small mistake you can make severe damage to your computer. We highly recommend you to take the Full Backup of your computer or make a restore point before starting to follow this method.
- Press the Windows Logo Key+R key simultaneously on your keyboard to launch the Run Command.
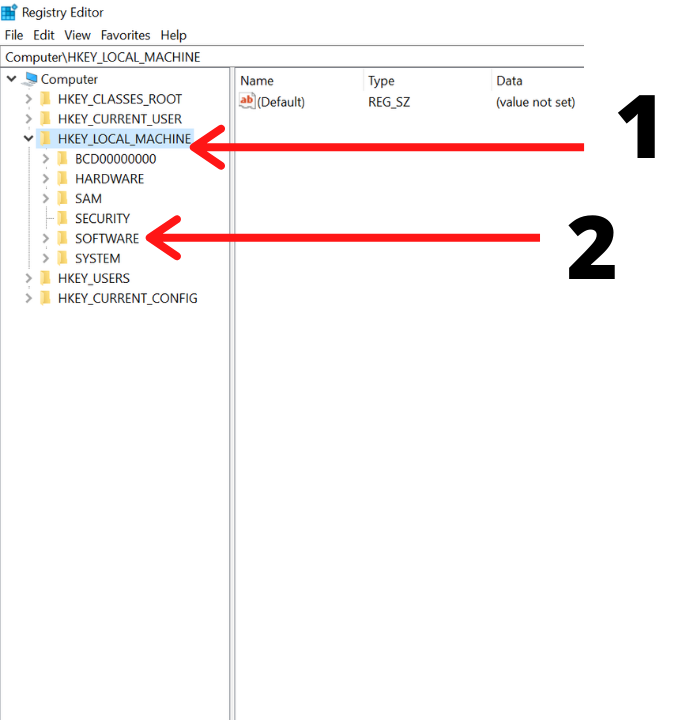
- In the Run box type regedit and hit Enter.

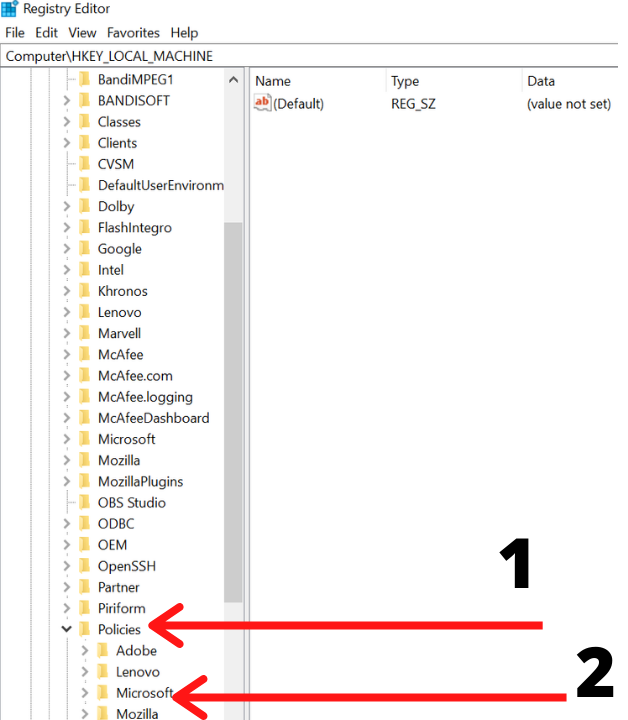
- Follow this path: HKEY_LOCAL_MACHINE\SOFTWARE\Policies\Microsoft\Windows

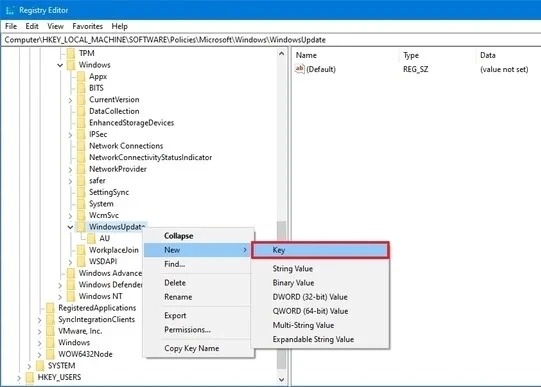
 Right-click on the Windows (folder) key which is available on the right side, select New and then click on Key.
- Now, you need to name the new key WindowsUpdate.

- Right-click on this newly created key and click on New and then select the Key option.
- Name this new key AU and hit Enter.
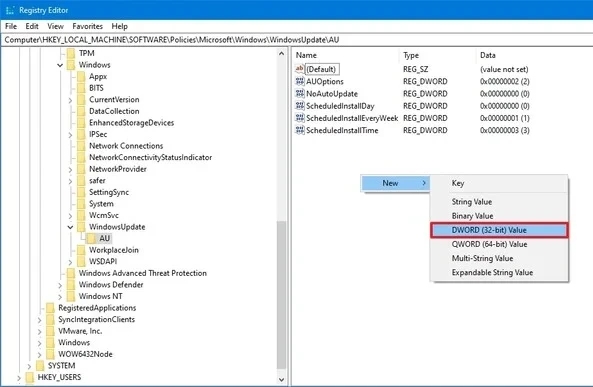
- Right-click on this AU Key, select New and then click on DWORD (32-bit) Value option.

- Name the new key NoAutoUpdate and then press Enter on your keyboard.
- Double-click the newly created key.
- You need to change it’s the value from 0 to 2 and then click on OK button. (2 is for Notify for download and notify for install)
- Restart your computer.
- If you want to undo the changes then repeat steps 1-4 again but on step 4 right-click on the WindowsUpdate key and select the Delete option. Restart your computer to apply the changes.
 Right-click on the Windows (folder) key which is available on the right side, select New and then click on Key.
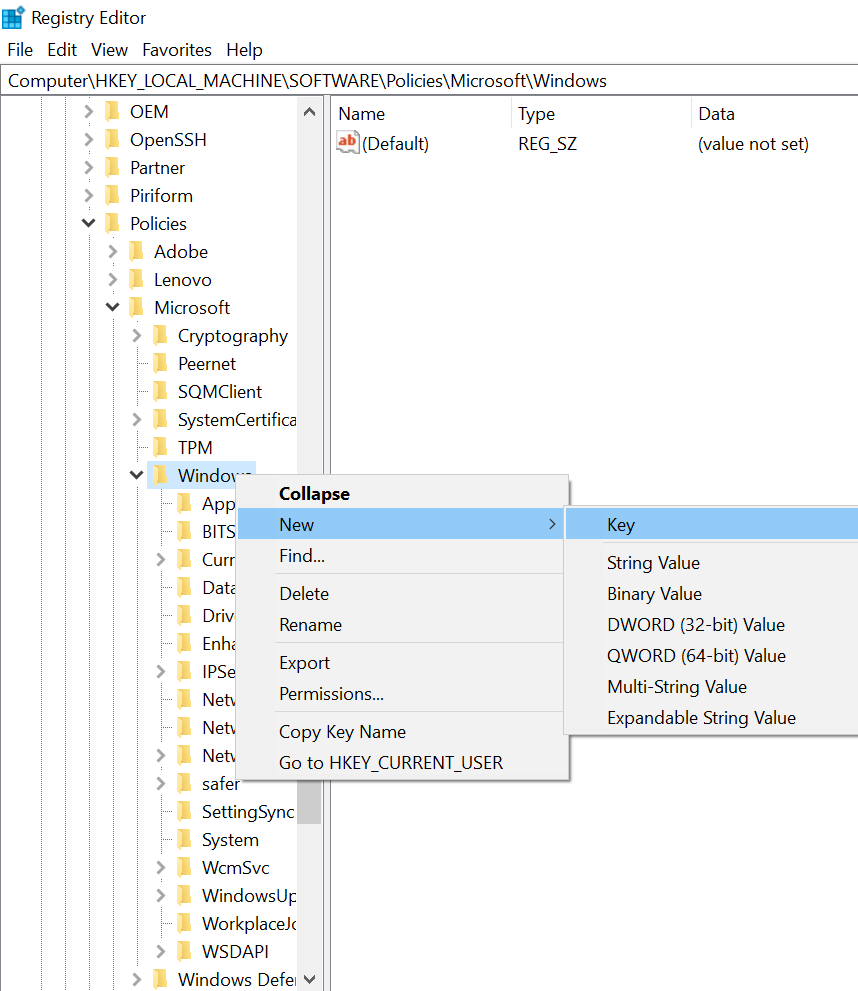
After Restarting your computer Windows Automatic Updates would be disabled. Although you would still be able to download and install the updates by clicking on Check for Updates button in Settings on the Windows Update Page.
MUST READ – How to Fix Windows 7 Update Error 80072EFE?
Concluding…
The Automatic Update is a great feature but to some users, it might create some problem. You can easily disable this feature by following the above methods properly. Make Sure after disabling this feature you manually check and install all the important updates. If you don’t install the updates for a longer period of time then your system may not work properly. This is because updates fix most of the errors and bugs apart from bringing some exciting features. We recommend you follow the methods in Chronological Order. Tell us in the comments why you want to disable this feature and which method helped you in disabling it. We have mentioned everything in great detail but, if you were finding it difficult to follow the steps write your query in the comments. We will surely respond with a solution.