
You want to do some important work on your computer. You open your Windows system only to find out a Black Screen with Cursor. Relax! It is a common problem in Windows which many users have faced. The main problem with this is that it doesn’t display any error code or any kind of message on the screen. It becomes difficult to understand the cause of this error and also to find an effective solution for it. So victims end up searches queries like Black Screen with Cursor error fix, How to Fix Black Screen in Windows with Cursor only, etc. But, you don’t need to worry. We are here to help you. In this article, we will tell you How to Fix Windows 10 Black Screen with Cursor Error easily and quickly!
[toc]
Boot Computer in Safe Mode (Mandatory Step)
If you cannot have access to Desktop then you need to boot in Safe Mode. We have mentioned a lot of troubleshooting steps below which require a desktop, so you must boot in Safe Mode.
- Start your computer and as soon as you see the Windows Logo press the Power Button to interrupt the boot sequence.
- Repeat the above steps 2-3 more times and Windows will automatically open the Automatic Repair Environment.
- From here, you can boot into Safe Mode.
If you face issues while booting into Safe mode then check out our Detailed Guide on booting in to Safe Mode. In this guide, you can find out all the steps to boot into Safe Mode in Windows 10 or Windows 8 or Windows 7.
NOTE: You need to perform all the below methods in Safe Mode. So, first, boot your computer in Safe Mode and then follow the solutions given below.
CHECKOUT – How to Fix Windows 7 Update Error 80072EFE?
Method 1: Force Shutdown your Computer (Only for Laptop)
This is one of the fastest and easiest ways to resolve the Black Screen with Cursor problem. You need to force Shutdown your computer and then restart it again.
- Hold the Power Button for at least 10-15 seconds to completely shut down your laptop.
- Disconnect everything which is connected to your laptop including the power cord.
- Remove the battery if you can and then press the Power Button for 60 seconds.
- Don’t connect unnecessary devices like printers, scanners, USB devices, 2nd Monitor, etc.
- Start your laptop again.
Method 2: Disconnect your Second Monitor
Many users reported that unplugging their second monitor helped them to resolve the Black Screen with Cursor problem. If you have a dual monitor setup then try unplugging your second monitor and then Restart your computer.
ALSO CHECK – How to Fix Second Monitor Not Detected in Windows?
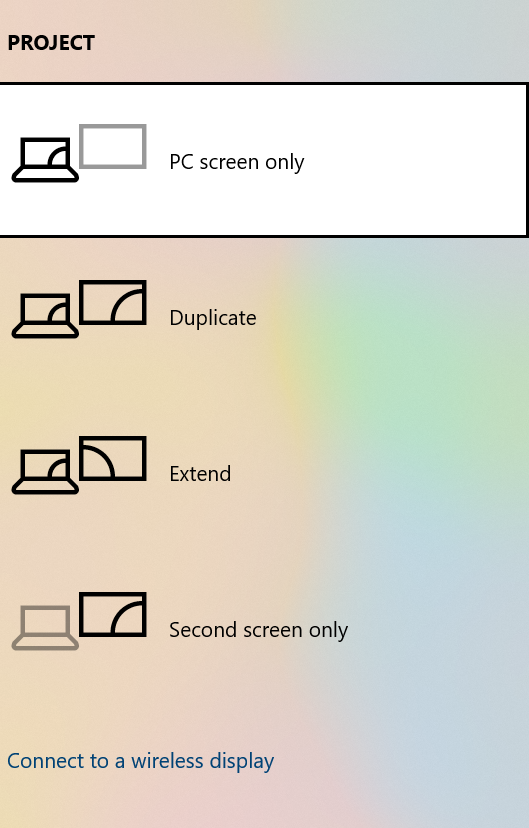
Method 3: Switch Displays using a Keyboard Shortcut
If you get the Windows 10 black screen with cursor before login screen then you can try switching the displays using the Windows Key + P Shortcut through your keyboard. After updating your Windows system the Project Mode may change to the Second screen only. Follow the steps given below:
- If your account is protected by a password then you need to enter the password first in order to login in.
- Press the Space or Ctrl Key and then enter your password. This might be difficult as you can only see the black screen. Keep trying and you will do it successfully.
- Press the Windows Logo Key and P Key simultaneously on your keyboard to open the Project menu.
- Press the up or down arrow key and hit Enter.

- If you select the option correctly your screen should reappear. If the black screen is still there repeat the above step a few times.
Method 4: Update your Graphics Drivers
An outdated or corrupted Graphics Driver can be the main reason behind the screen keeps going black problem. In this scenario, you need to update your graphics drivers.
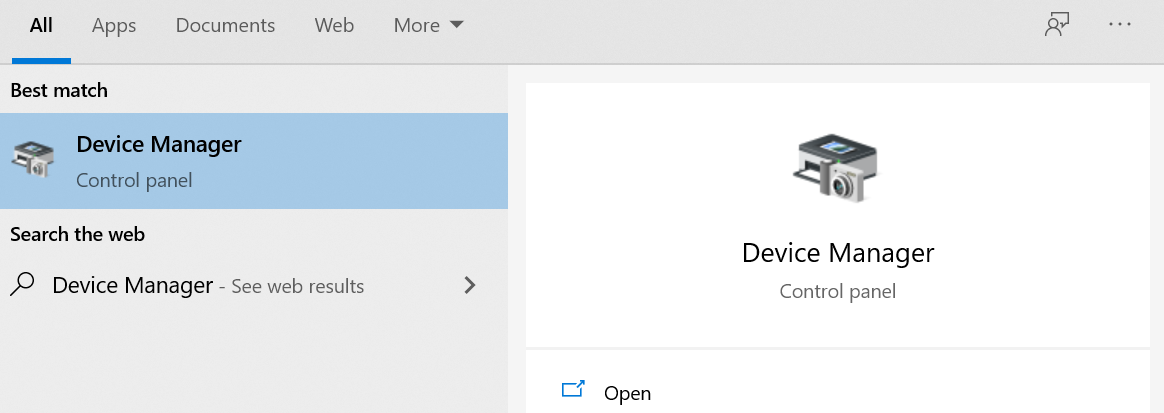
- On your Windows Search Box type Device Manager and click on the top result which appears on your screen.

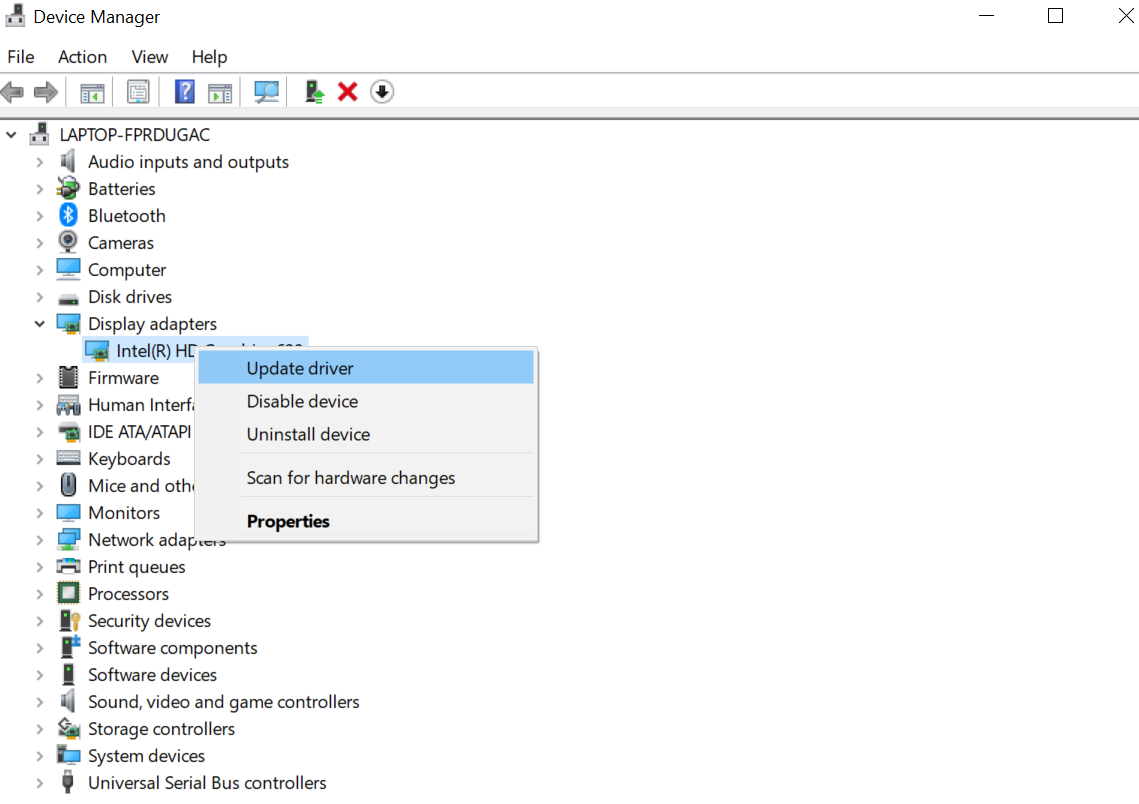
- Double-click on Display Adapters to expand it.
- Right-click on your Graphics Driver and select the Update driver option from the drop-down menu.

- Click on Search automatically for updated driver and software option.
- Windows will automatically download and install the latest drivers on your computer.
- Once the latest drivers are installed Restart your computer.
- For some reason if Windows cannot automatically install the latest drivers go to your Manufacturer’s Website and download the latest drivers.
- Once you have downloaded the drivers repeat steps 1-3 again.
- Select the Browse my computer for driver software option.
- Give the location where you have downloaded the drivers.
- Once you have installed them Restart your computer.
Method 5: Uninstall your Graphics Card Driver
If updating the graphics card doesn’t help you then you should uninstall it. Follow the instructions given below:
- Open Device Manager again and double-click on Display Adapters to expand it.
- Right-click on your Graphics Driver and select the Uninstall driver option.

- If you get a Confirmation Message check the Delete driver software for this device box and hit the Uninstall button.
- Once you have uninstalled the Driver successfully Restart your computer.
- Windows will automatically install the missing drivers at the time of booting up and you won’t see a full black screen on your Monitor.
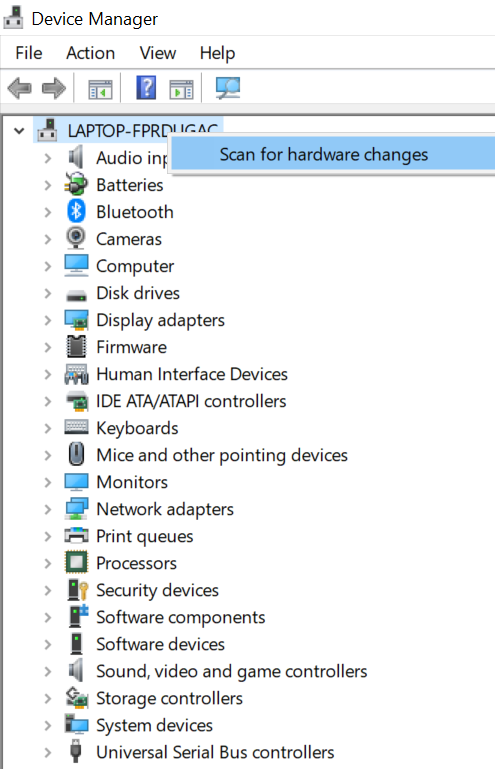
- If you find that Windows has not installed the driver’s open Device Manager again.
- On the top right-click on your computer name and select the Scan for Hardware Changes option.

- Windows will now install the missing drivers. If still the drivers are not installed hop over to your Manufacturer’s Website and download the latest drivers.

YOU MAY ALSO LIKE – How to Fix Steam Disk Write Error on any Game?
Method 6: Use the Task Manager
After signing into Windows 10 if you get the black screen but, still if you can use the mouse pointer then there is some problem with the Task Manager.
- Press the Ctrl + Shift + Esc keys simultaneously on your keyboard to launch the Task Manager.
- If Task Manager is not launched you can press the Ctrl + Alt + Del keys to launch it.
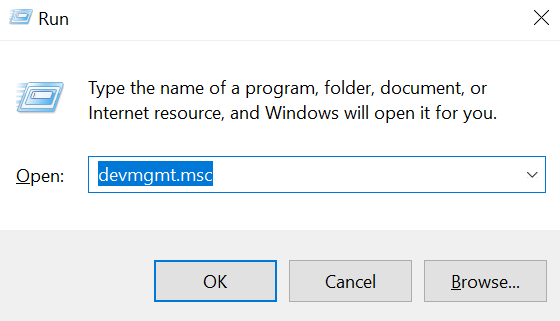
- You can also open it by Run Command. Press the Windows+R key on your computer to launch the Run Command. In the Run Box type devmgmt.msc and hit Enter.

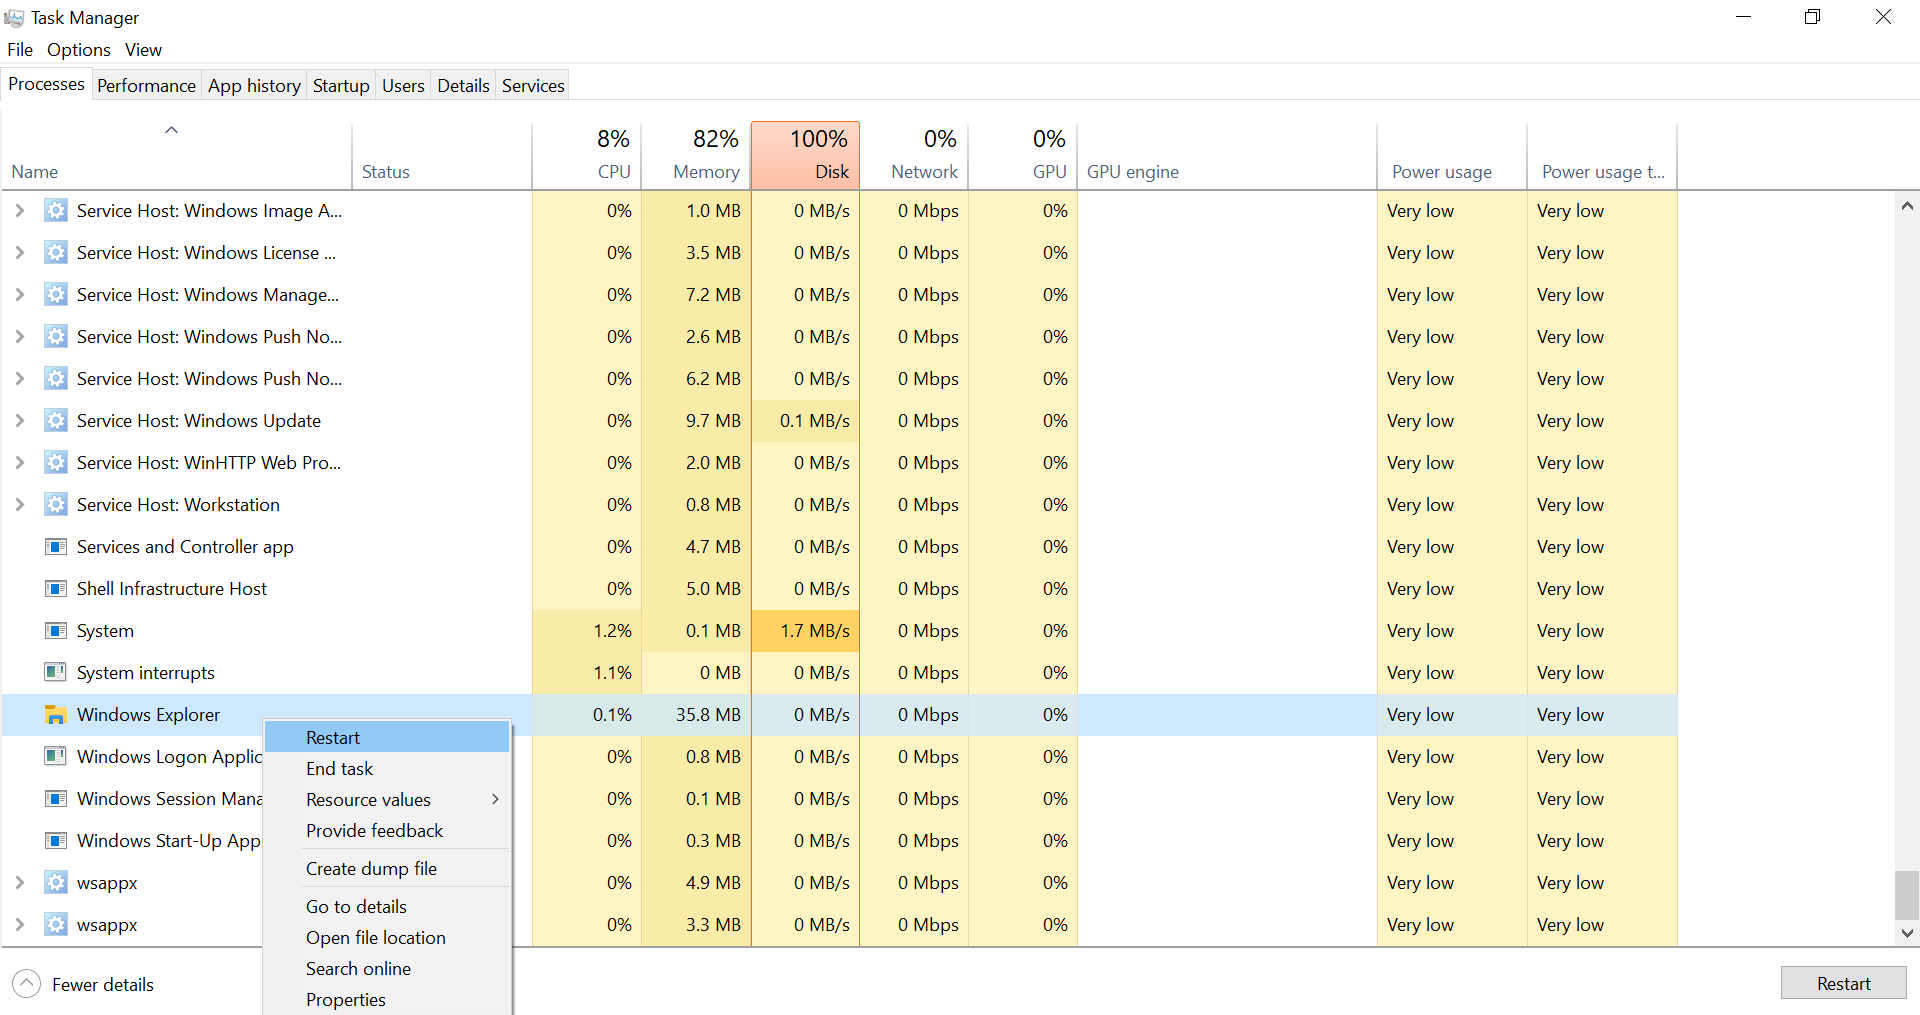
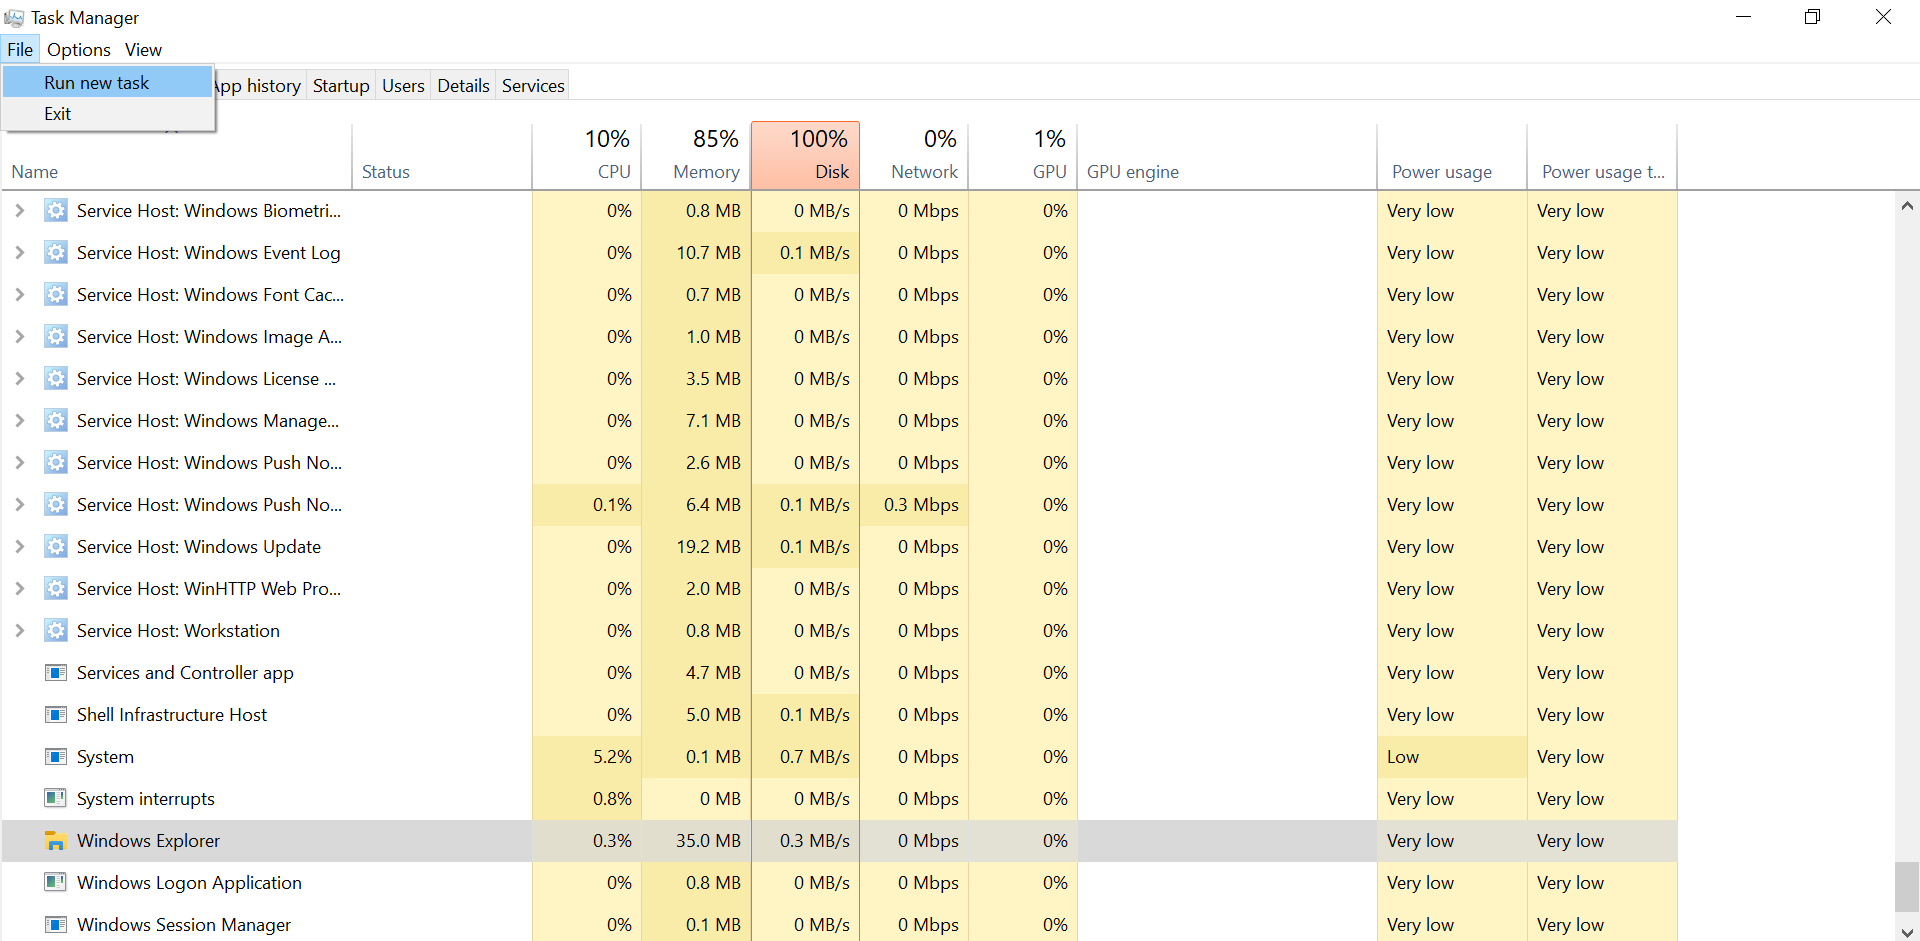
- On the bottom click on the More details button.
- Find the Windows Explorer service from the list and click on it.
- On the bottom right corner hit the Restart button.

- Hopefully, the problem should get resolved now.
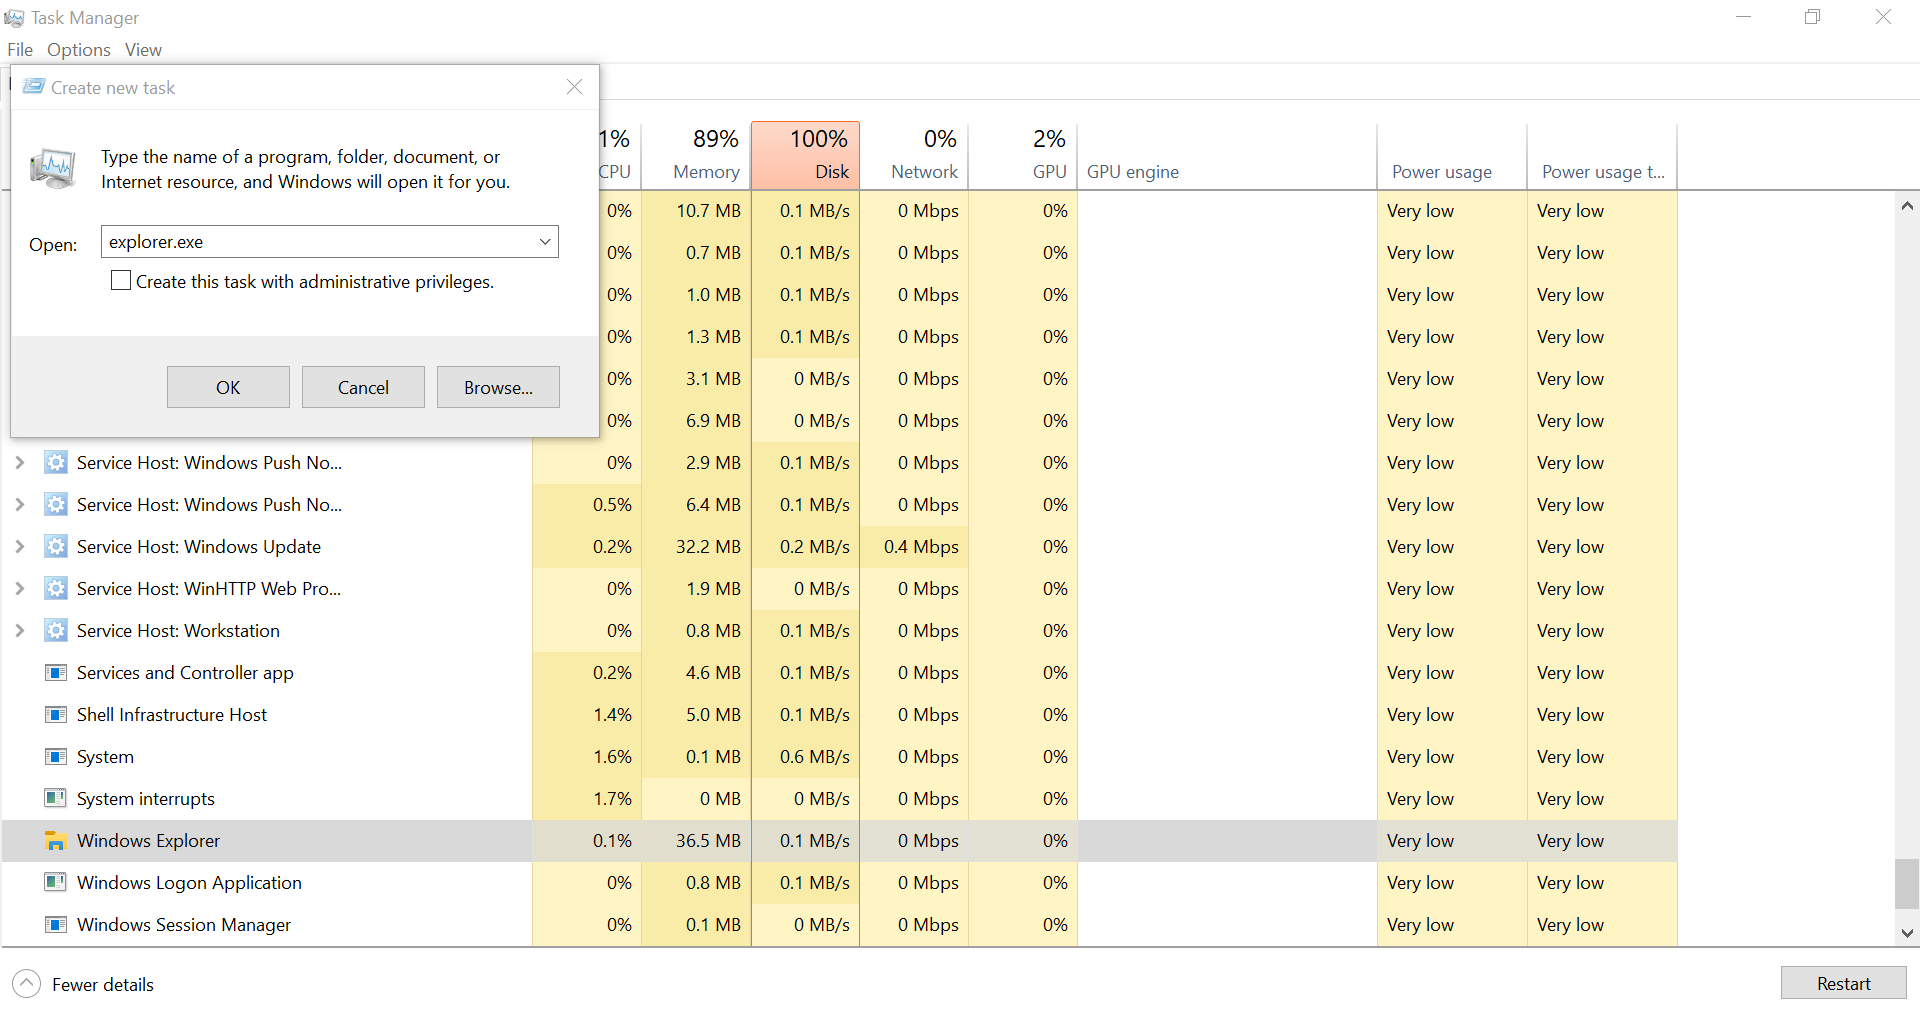
Restart explorer.exe
- If the above steps didn’t help you then open the Task Manager again.
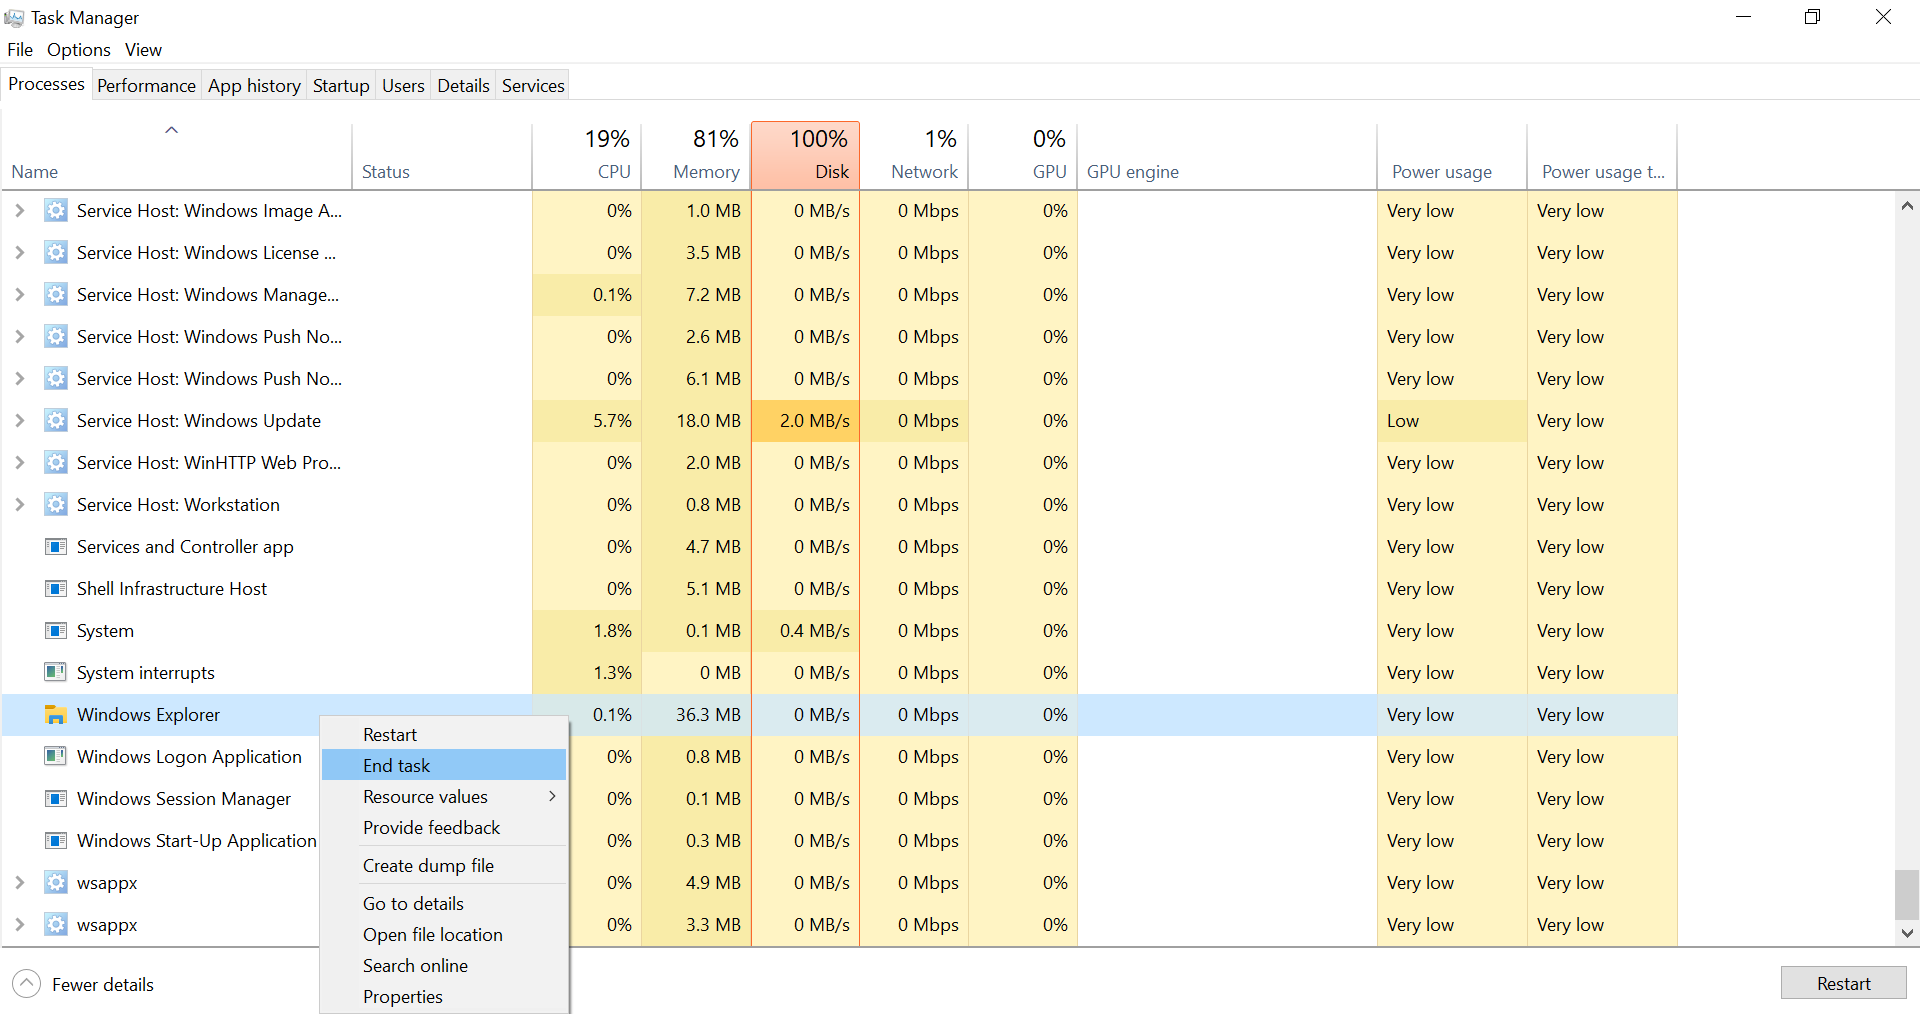
- On the bottom click on the More details button.
- Right-click on the Windows Explorer service and select the End task option. (If you don’t see this option don’t worry just follow the next step)

- On the top click on File and then select the Run new task option. (If you are not able to see the File Menu click on More Details)

- In the Box type explorer.exe and hit the OK button.

- Now, you should be able to use your computer without any problem.
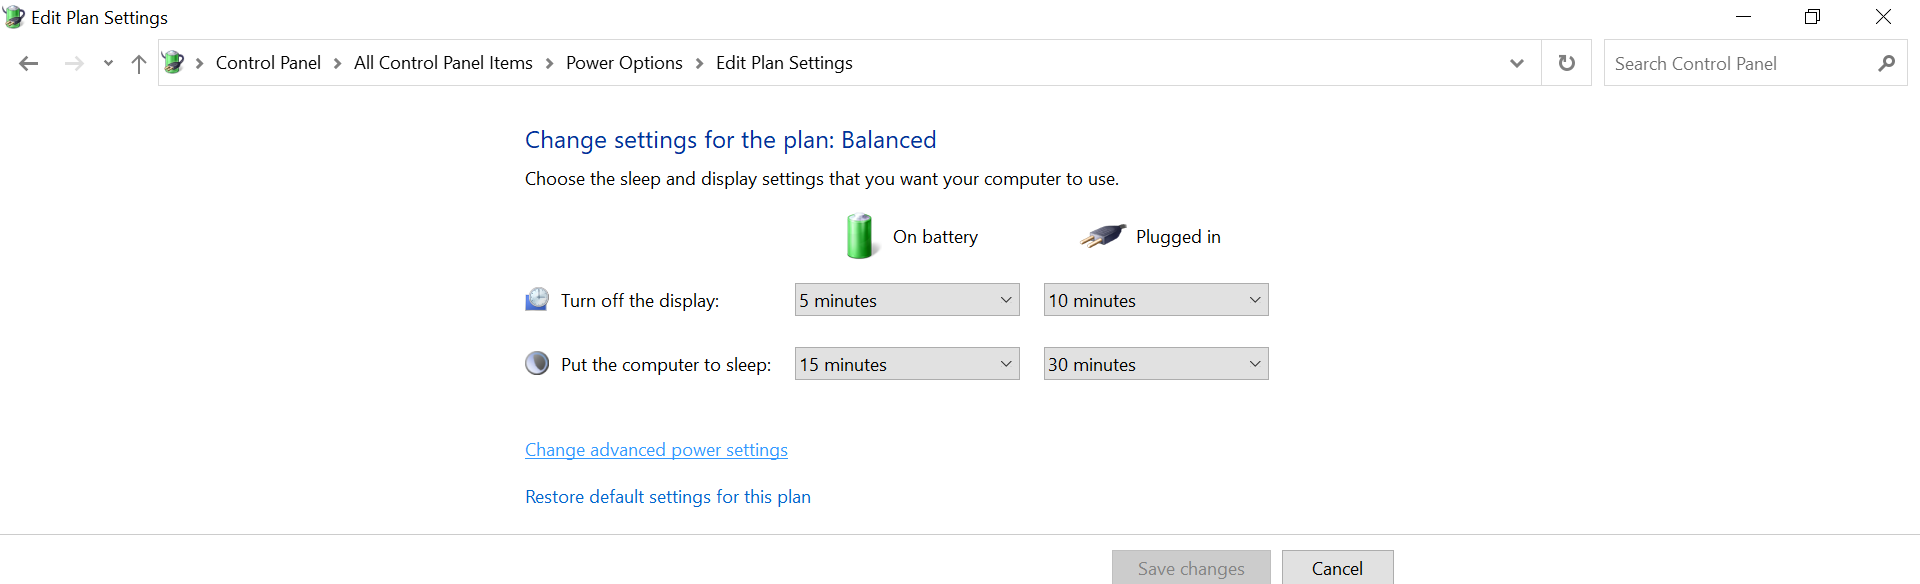
Method 7: Change Display Brightness
If you only get the black screen with cursor problem when you connect the AC adapter to your computer then this solution is for you. A problem in display brightness can cause you the black screen. To fix this follow the steps given below:
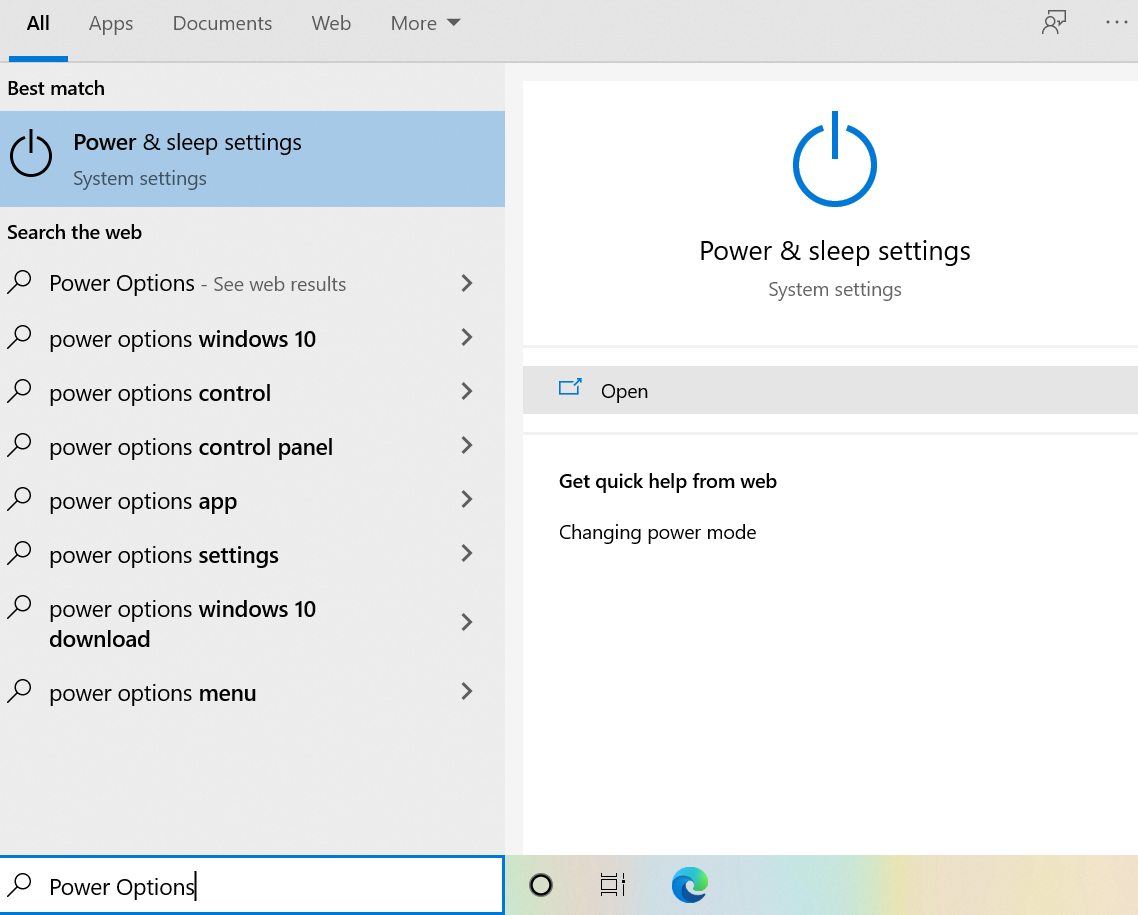
- On your Windows Search Box type Power Options and click on the first option.

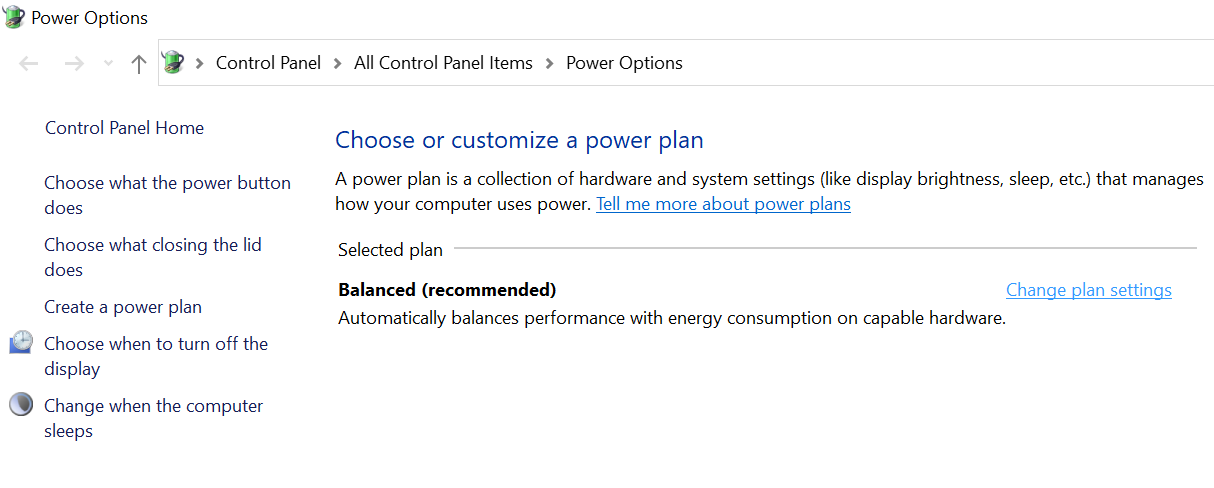
- Click on Additional Power Settings option which is available on the right side.

- On the right side find your current plan. The one which is checked or has a small dot beside it is your current plan.
- Besides your current plan click on the Change plan settings option.

- Click on Change advanced power settings.

- Find the Display brightness setting and set the display brightness to 99% or 98%.
- Save the changes and Restart your computer.

Method 8: Disable Fast Startup
Disabling the Fast Startup might help you to resolve this issue. Fast Startup provides a faster boot time when you start your computer.
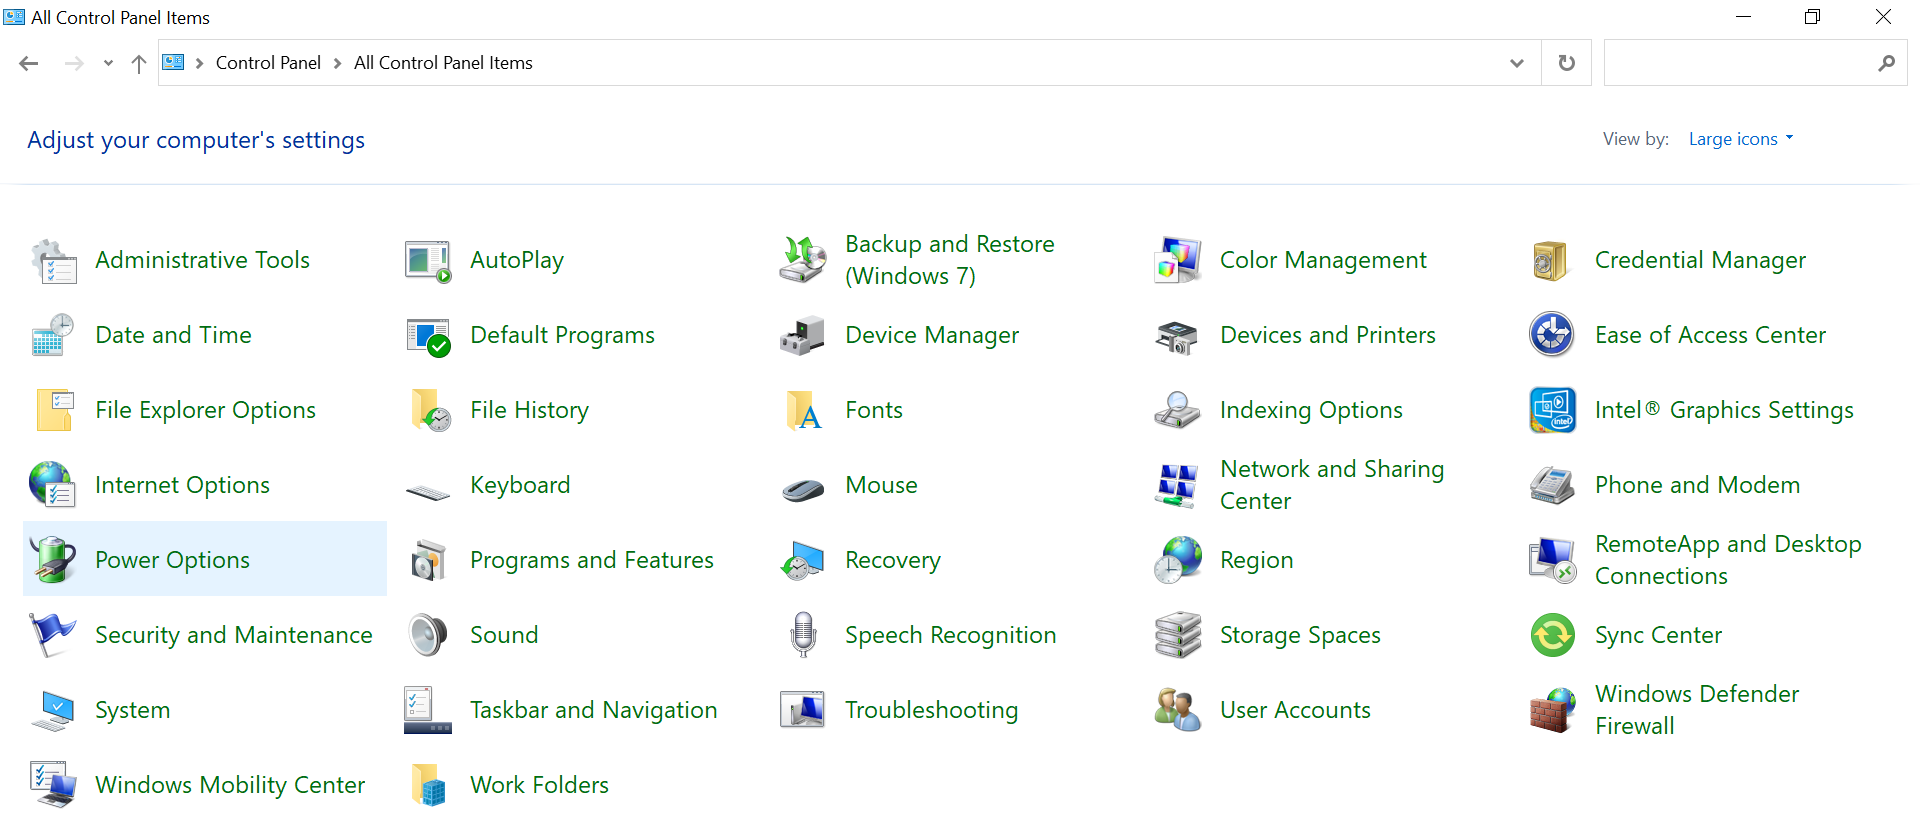
- Type Control Panel on your Windows Search Box and click on the first option.
- On the top right corner change the View mode to Large Icons.
- Click on Power Options.

- You would be redirected to the Power Options Window.
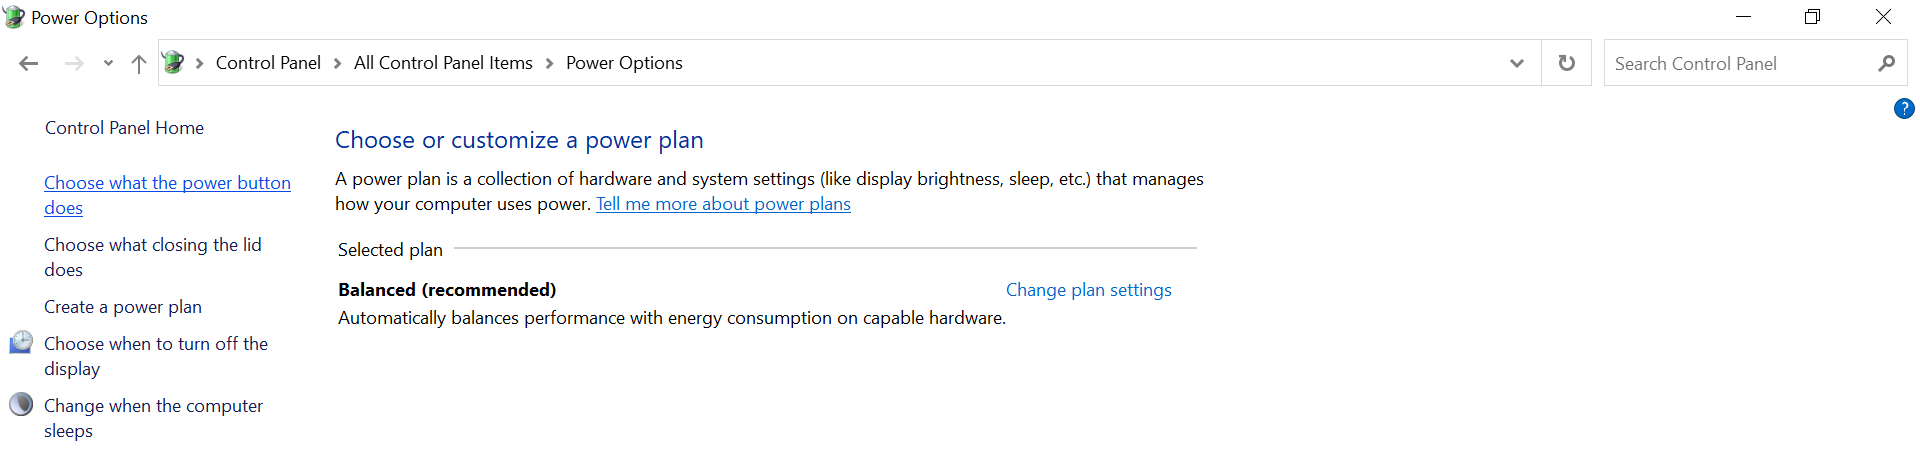
- Click on Choose what the power buttons does
 option which is available on the right side.
 - Then click on Change settings that are currently unavailable.
- Uncheck the Turn on fast startup (recommended) box and hit the Save Changes button.

- Restart your computer and now you should get access to your Desktop.
- If you want to Enable Fast Startup repeat the above steps again.
- In step 7 check the Turn on fast startup (recommended) box and hit the Save Changes button.
 option which is available on the right side.
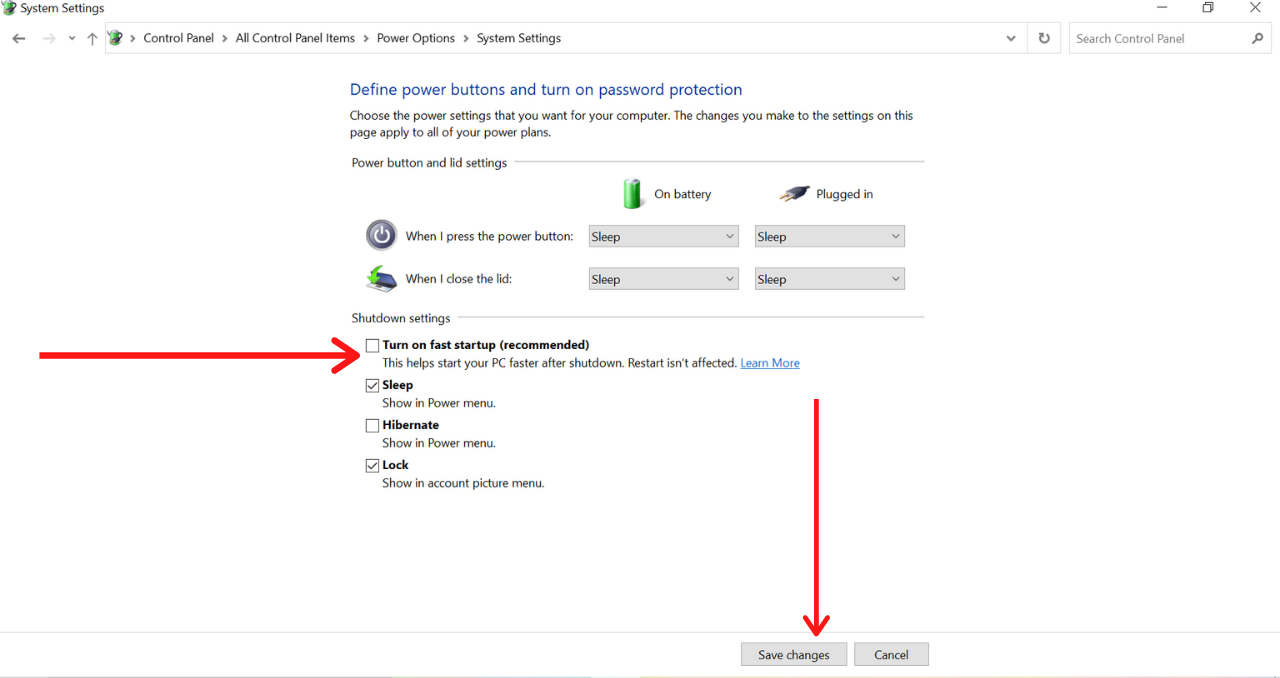
MUST READ – Trick to Get Netflix Free Trial without Credit Card – [5 Methods]
Method 9: Disable all the Third Party Services
A problematic software might cause you the black screen problem. If you are using the UxStyle and StartIsBack software or any other software like this uninstall it immediately. Although if you are not using this software then you need to find out which software is causing you this problem.
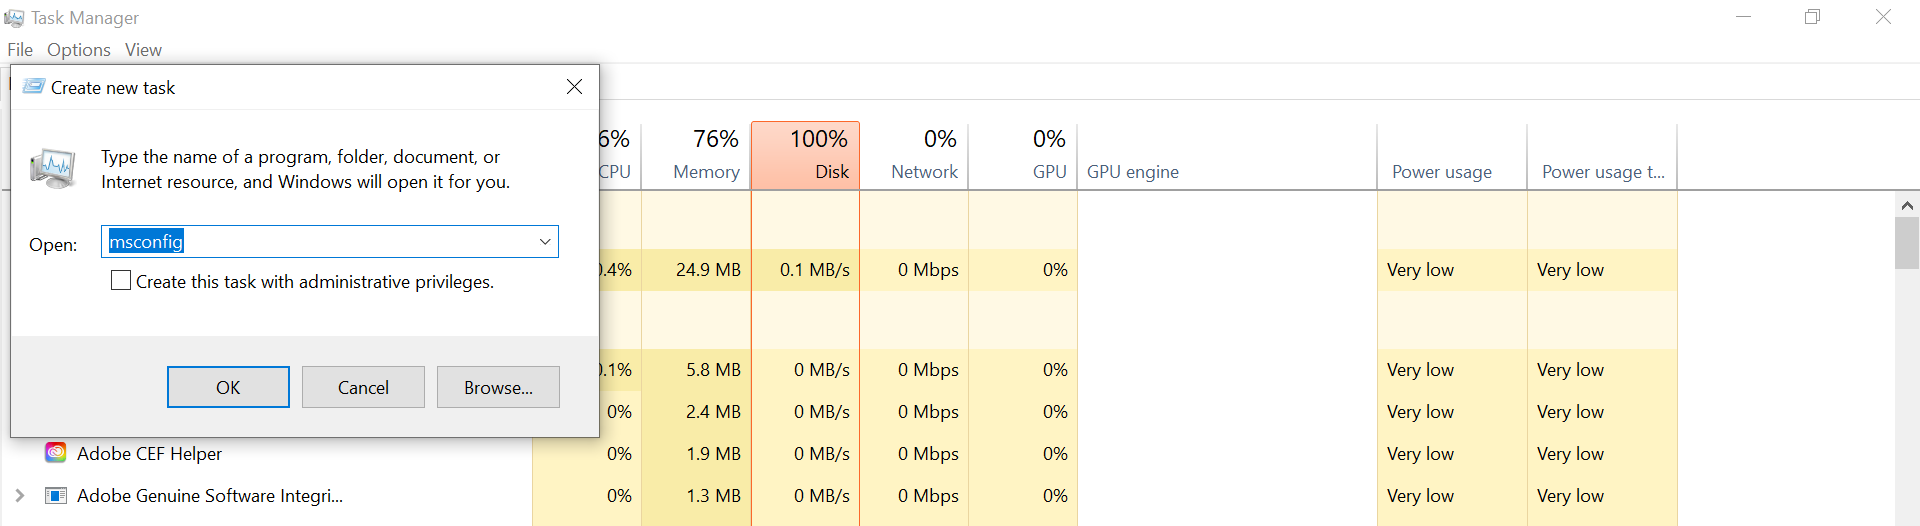
- Open Task Manager again on your computer.
- On the top click on the File menu and then select the Run new task option from the drop-down menu.
- Type msconfig and hit the OK button.

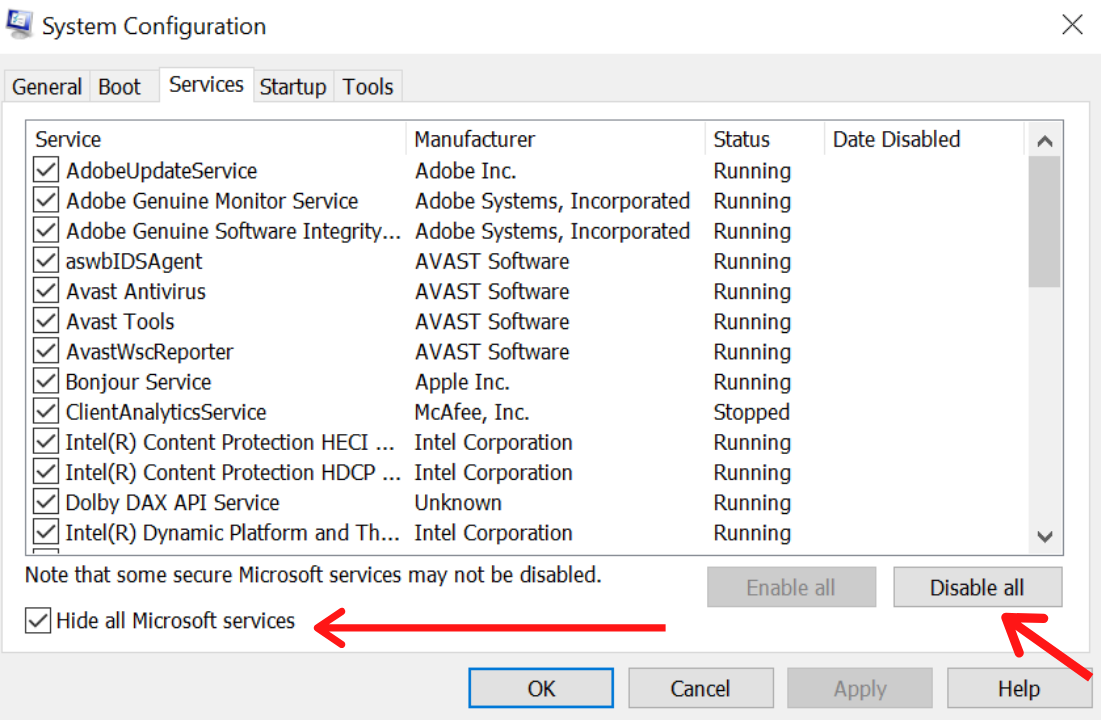
- On the top click on the Services tab.
- Check the Hide all Microsoft services box.
- Now, all the Microsoft Services are excluded from the list.
- Click on Disable all button then hit the OK button.

- Restart your computer.
- After Restarting if Windows boots to desktop then one of the programs installed on your computer is causing you this problem.
- Repeat Steps 1-6 again and enable the services one by one and then Restart your computer.
- Do this step again and again until you find the problematic software.
- Once you find the problematic software uninstall it.
Method 10: Disable the App Readiness Service
If you get the Windows 10 black screen at the time of login then disabling the App Readiness Service should help you. Follow the instructions given below:
- Open Task Manager by pressing the Ctrl + Shift + Esc or Ctrl + Alt + Del keys simultaneously on your keyboard.
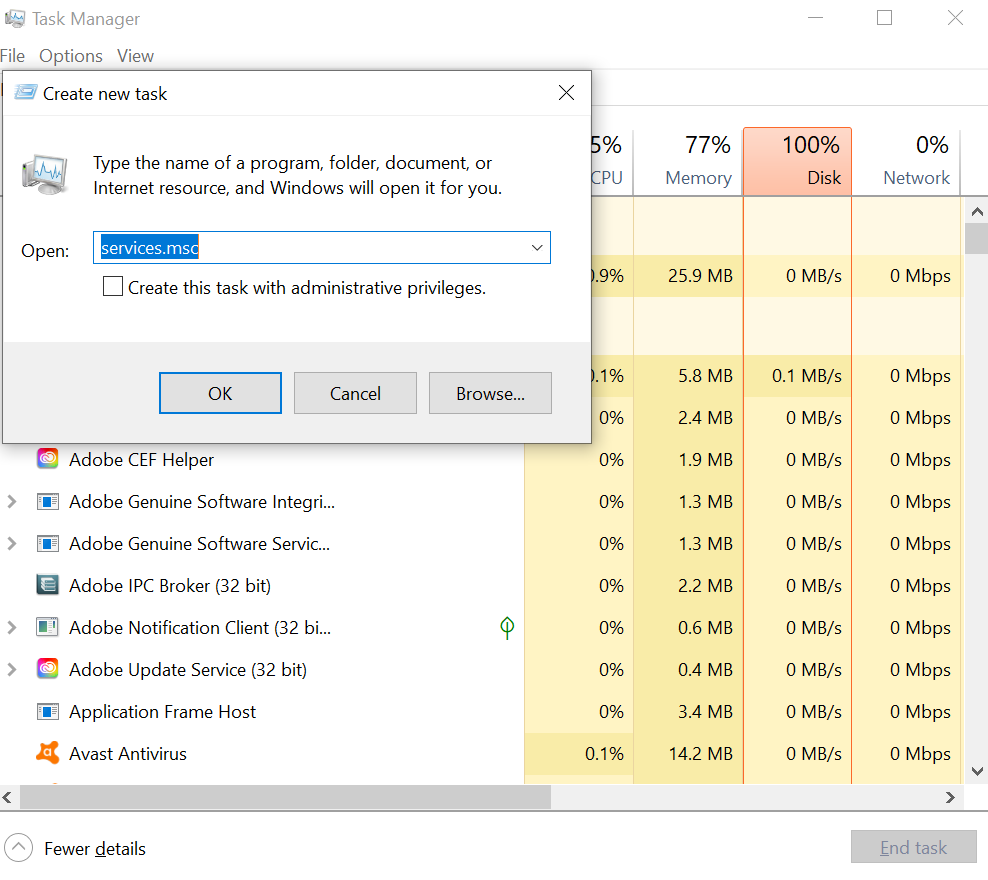
- Once you open the Task Manager click on File Menu.
- Select the Run new task option.
- Type services.msc and hit the OK button.

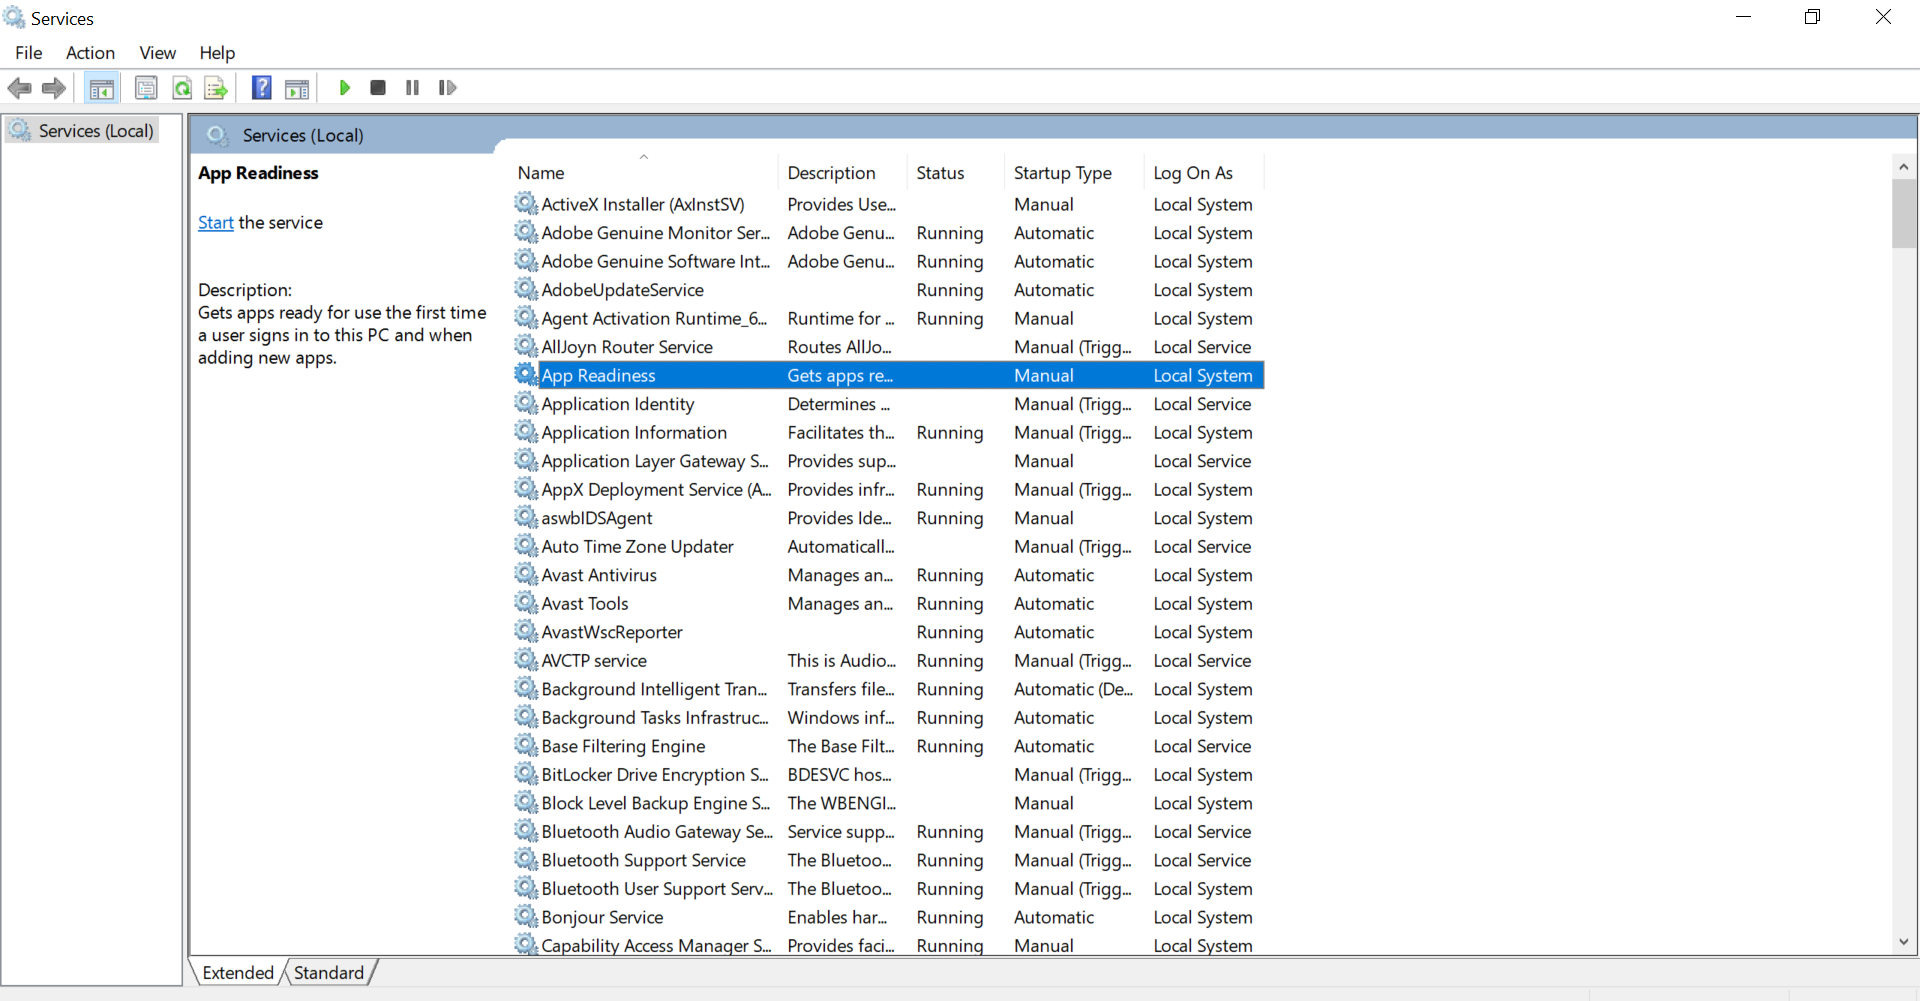
- You would be redirected to the Services Window.
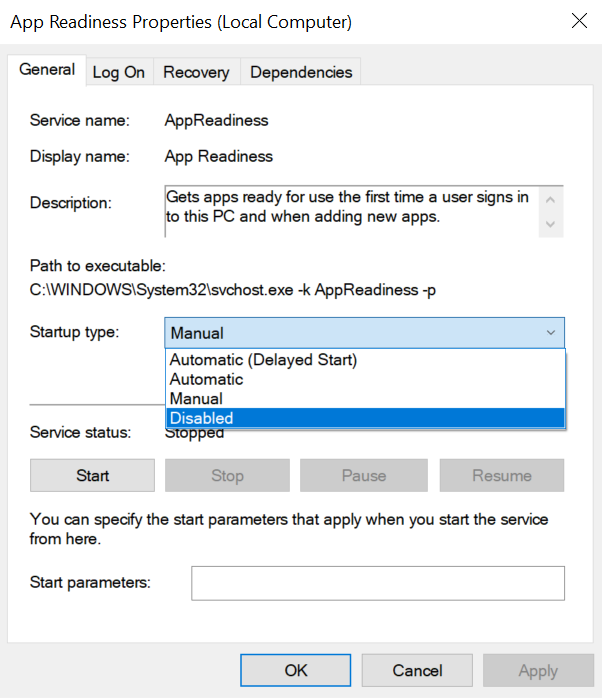
- Find and double-click on the App Readiness Service to launch its Properties.

- From the drop-down menu set the Startup type to Disabled and hit the OK button.

- Restart your computer.
Method 11: Create a New User Account:
A corrupted Windows user profile can also cause you the black screen problem. Login in with a different user profile and if you don’t face any problem a corrupted user profile is the root cause of this problem.
- First, you need to make a new user account.
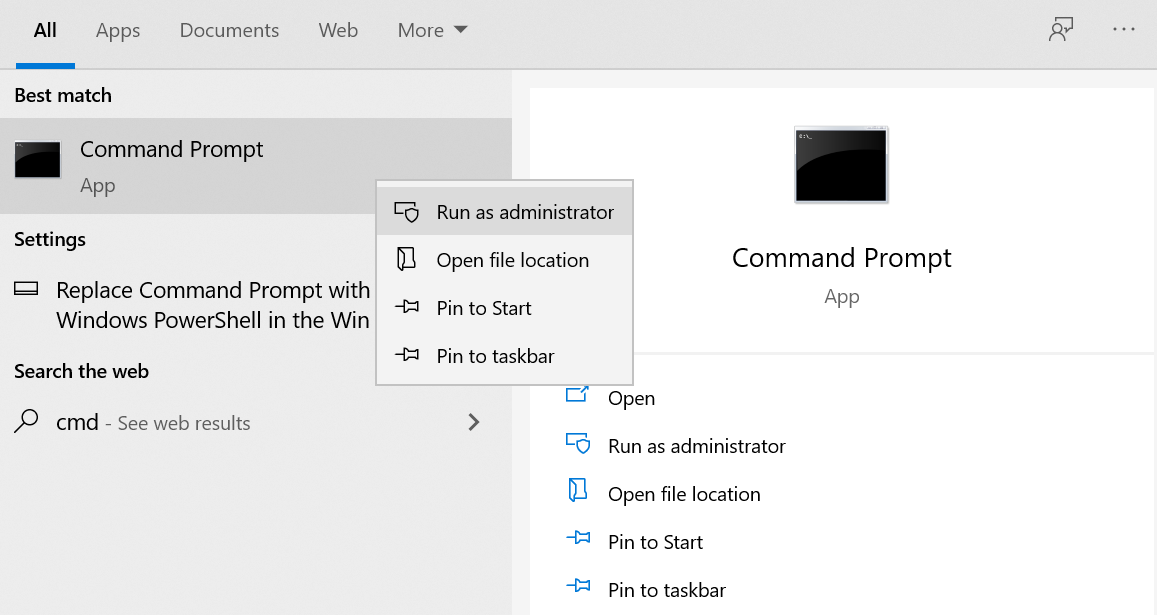
- Before making a new account your current user account should be an administrator.
- To make your account administrator type Command Prompt on your Windows Search Box and right-click on the top result and select the Run as Administrator option.

- In the Command Prompt type net user administrator /active:yes and then press the Enter key.
- Restart your computer and you should be able to log in with the administrator account.
- Now, it’s time to create a new user account.
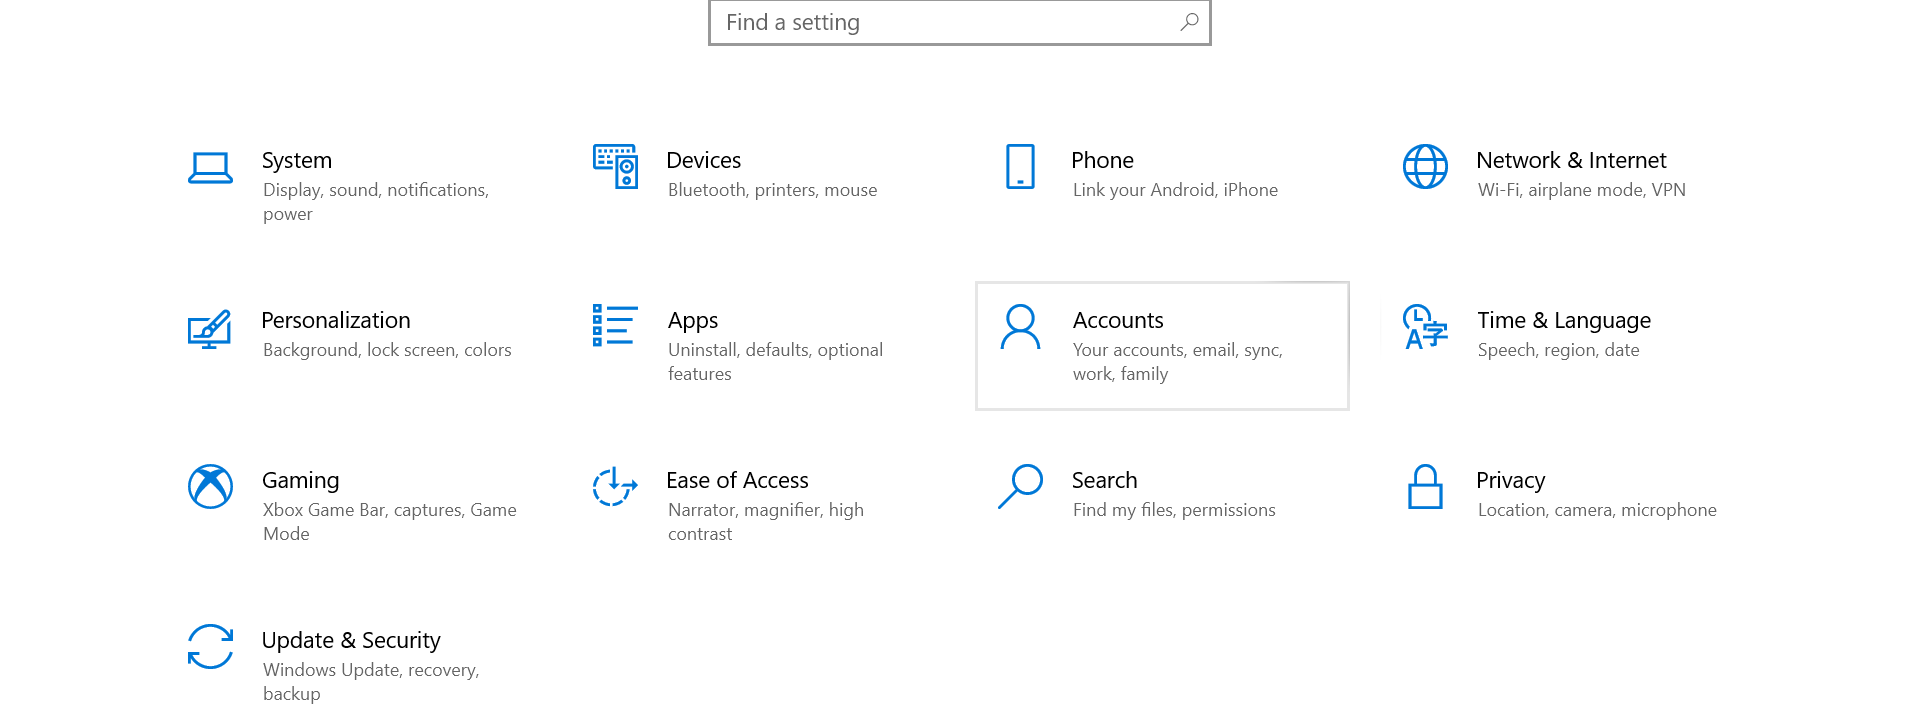
- Press the Windows Logo Key and I Key simultaneously on your keyboard to launch Settings.
- Click on Accounts.

- On the right side click on Add someone else to this PC.

- To create the new account simply follow the on-screen instructions.
- Log in to this newly created account and check if the problem still exists or not.
- If the black screen is not there and Windows is functioning properly then the corrupted user profile is causing you this problem.
- Now, you need to replace the Caches folder of the corrupted user profile with the folder of the newly created account.
- To do this log in with the new account.
- Follow this path: C:\Users\{working-user-profile-name}\AppData\Local\Microsoft\Windows\Caches
- Copy the Caches folder.
- Now, you need to log in with the corrupted user account.
- Follow this path: Navigate to C:\Users\{broken-user-profile-name}\AppData\Local\Microsoft\Windows\Caches.
- Replace this folder with the folder from the new user account.

Method 12: Use System Restore Point
If you are facing the black screen problem after updating your Windows System or have made some changes to it then you need to undo the system changes. For this, you can use the System Restore Point. Before updating your System Windows automatically creates a system restore point. If after updating your system you face any problem you can revert back the changes. Check out our detailed guide on System Restore. In this article follow the How to Perform System Restore on Windows 10 from Boot? method to successfully use the System Restore Point.
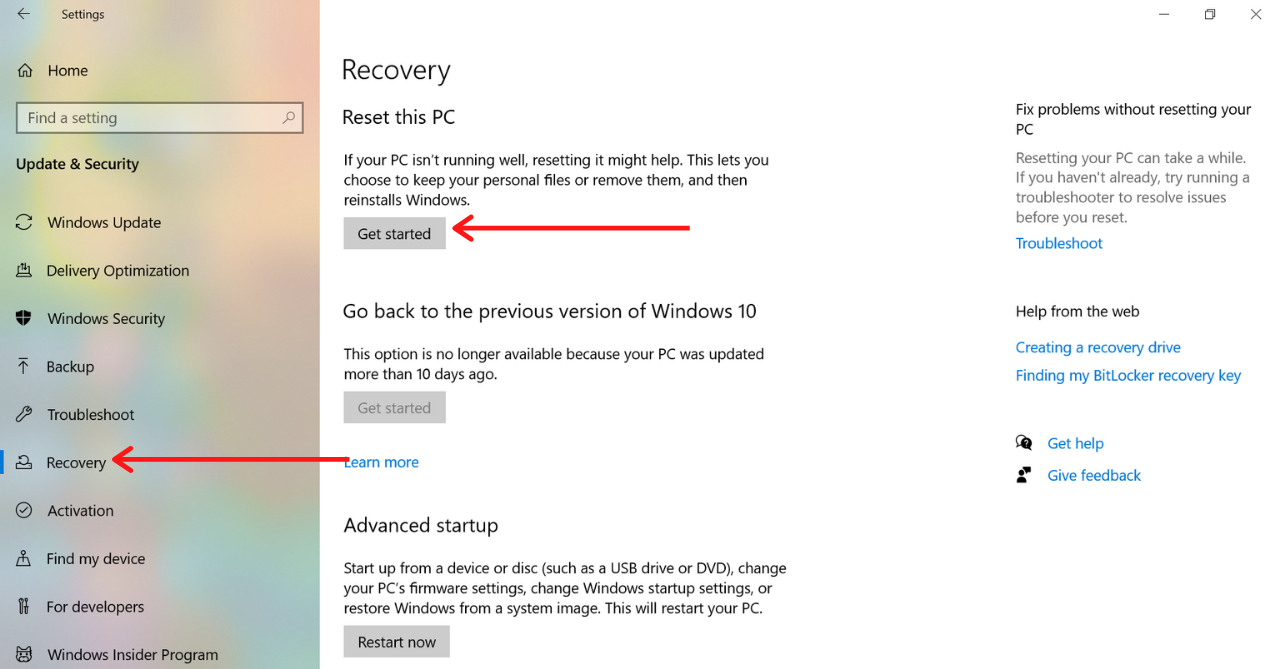
Method 13: Reset your Computer
After trying all the above solutions if still you get the black screen then you need Reset your computer to fix this problem. When you Reset the computer Windows get reinstalled entirely.
(You would be able to keep some of your files but we highly recommend you to take an entire backup of your important files)
- Open Settings by pressing the Windows Key+I key simultaneously on your keyboard.
- You can also open it by typing Settings on your Windows Search Box.
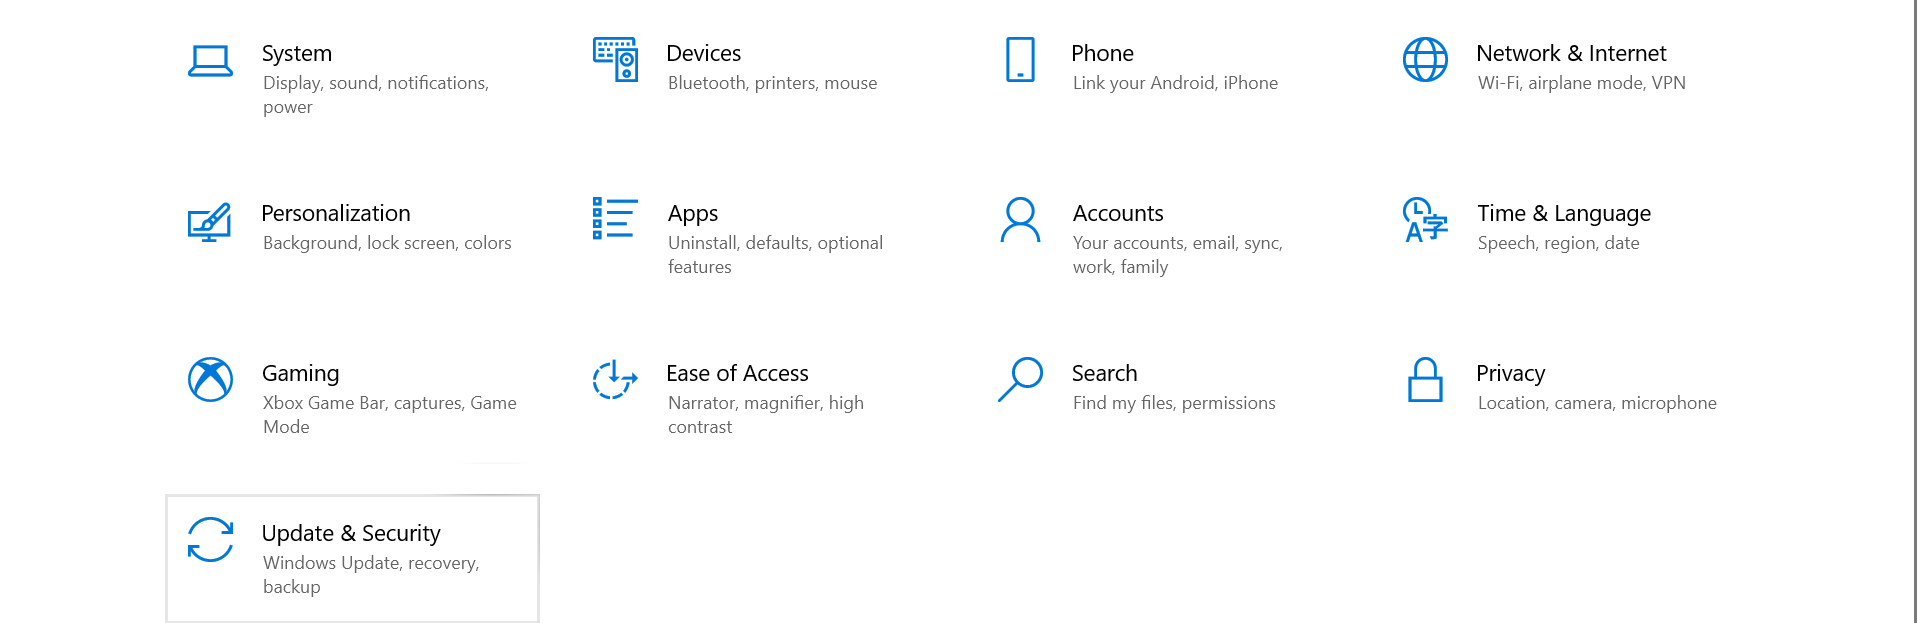
- Click on the Update and Security option.

- On the left side click on Recovery.
- Under the Reset this PC section hit the Get Started button.

- Select the Keep my files option.
- Now, you need to select the Local reinstall option. If you are not able to reinstall Windows using the Local reinstall select the Cloud download option.
- On the next page your Current Settings should be like:
Restore apps and settings which came with this PC
Reinstall Windows from this device - If you don’t see the above two options hit Change Settings. On the other hand, if you see the above two options click on Next.
- Select the View apps that will be removed option. You will get a list of apps that will get removed.
- Click on Back and finally hit the Reset button.
READ THIS – How to Fix Class Not Registered Error on Windows?
Concluding…
We hope that at least one of the above methods helped you in resolving the black screen with the cursor problem. Select the method according to your problem. Do tell us in the comments section which method helped you. Did we miss any solution? If you know any other method write about it in the comments. We have mentioned everything in detail. But, if you were finding it difficult to follow the above steps then you can write your query in the comments. We will surely respond with a solution. Also, if you are facing any other Blue Screen Error on Windows then make sure to search the error on this blog and probably you will get the solution here itself.